Crestron
Niet gecategoriseerd
FT2A-UTK-CLOAK-WIDE
Crestron FT2A-UTK-CLOAK-WIDE Handleiding
Hier is de Crestron FT2A-UTK-CLOAK-WIDE (Niet gecategoriseerd) gebruikershandleiding. 2 pagina's in taal met een gewicht van 349,444.0 Mb. Als u geen antwoorden op uw probleem kunt vinden Vraag het onze community.
Pagina 1/2
The Crestron® FT2A‑UTK‑CLOAK, FT2A‑UTK‑CLOAK‑1T, FT2A‑UTK‑CLOAK‑WIDE, and FT2A‑UTK‑CLOAK‑WIDE‑1T are used to conceal
exposed cables and retractors in under‑table FT2 Series FlipTop™ applications.
The FT2A‑UTK‑CLOAK, FT2A‑UTK‑CLOAK‑WIDE, FT2A‑UTK‑CLOAK‑1T, and FT2A‑UTK‑CLOAK‑WIDE‑1T are functionally similar. For simplicity
within this guide, the term “cloak” is used except where noted.
The following information provides compatible FlipTop models and cable retractor types for each cloak.
Cloak Model Compatible FT2 Series Model
FT2A‑UTK‑CLOAK
Conceals up to four gravity retractors.
FT2‑202‑MECH, FT2‑202‑MECH‑AC, FT2‑202‑MECH‑ACUSB, FT2‑500‑MECH,
FT2‑500‑MECH‑AC, FT2‑500‑MECH‑ACUSB, FT2‑700‑MECH, FT2‑700‑MECH‑AC, FT2‑700‑
MECH‑ACUSB, FT2‑1200‑MECH, FT2‑1200‑MECH‑AC, FT2‑1200‑MECH‑ACUSB
FT2A‑UTK‑CLOAK‑1T
Conceals up to four one‑touch retractors.
FT2‑202‑ELEC, FT2‑500‑ELEC, FT2‑700‑ELEC, FT2‑1200‑ELEC
FT2A‑UTK‑CLOAK‑WIDE
Conceals up to four gravity retractors.
FT2‑1400‑MECH, FT2‑1400‑MECH‑AC, FT2‑1400‑MECH‑ACUSB
FT2A‑UTK‑CLOAK‑WIDE‑1T
Conceals up to four one‑touch retractors.
FT2‑1400‑ELEC
FT2A-UTK-CLOAK FT2A-UTK-CLOAK-WIDE-1T
>
>
*Inside
Hook-and-loop
fastener strips (4)
*Inside
Hook-and-loop
fastener strips (4)
Check the Box
Item Qty
FT2A-UTK-CLOAK, FT2A-UTK-CLOAK-1T, FT2A-UTK-CLOAK-WIDE, or FT2A-UTK-CLOAK-WIDE-1T 1
Attach the Cloak
Attach the cloak to the FlipTop assembly after the assembly has been installed in the table and the cable retractors and modules are installed
in the assembly.
NOTE: Do not fold the cloak. Once creases are made in the fabric, they cannot be removed.
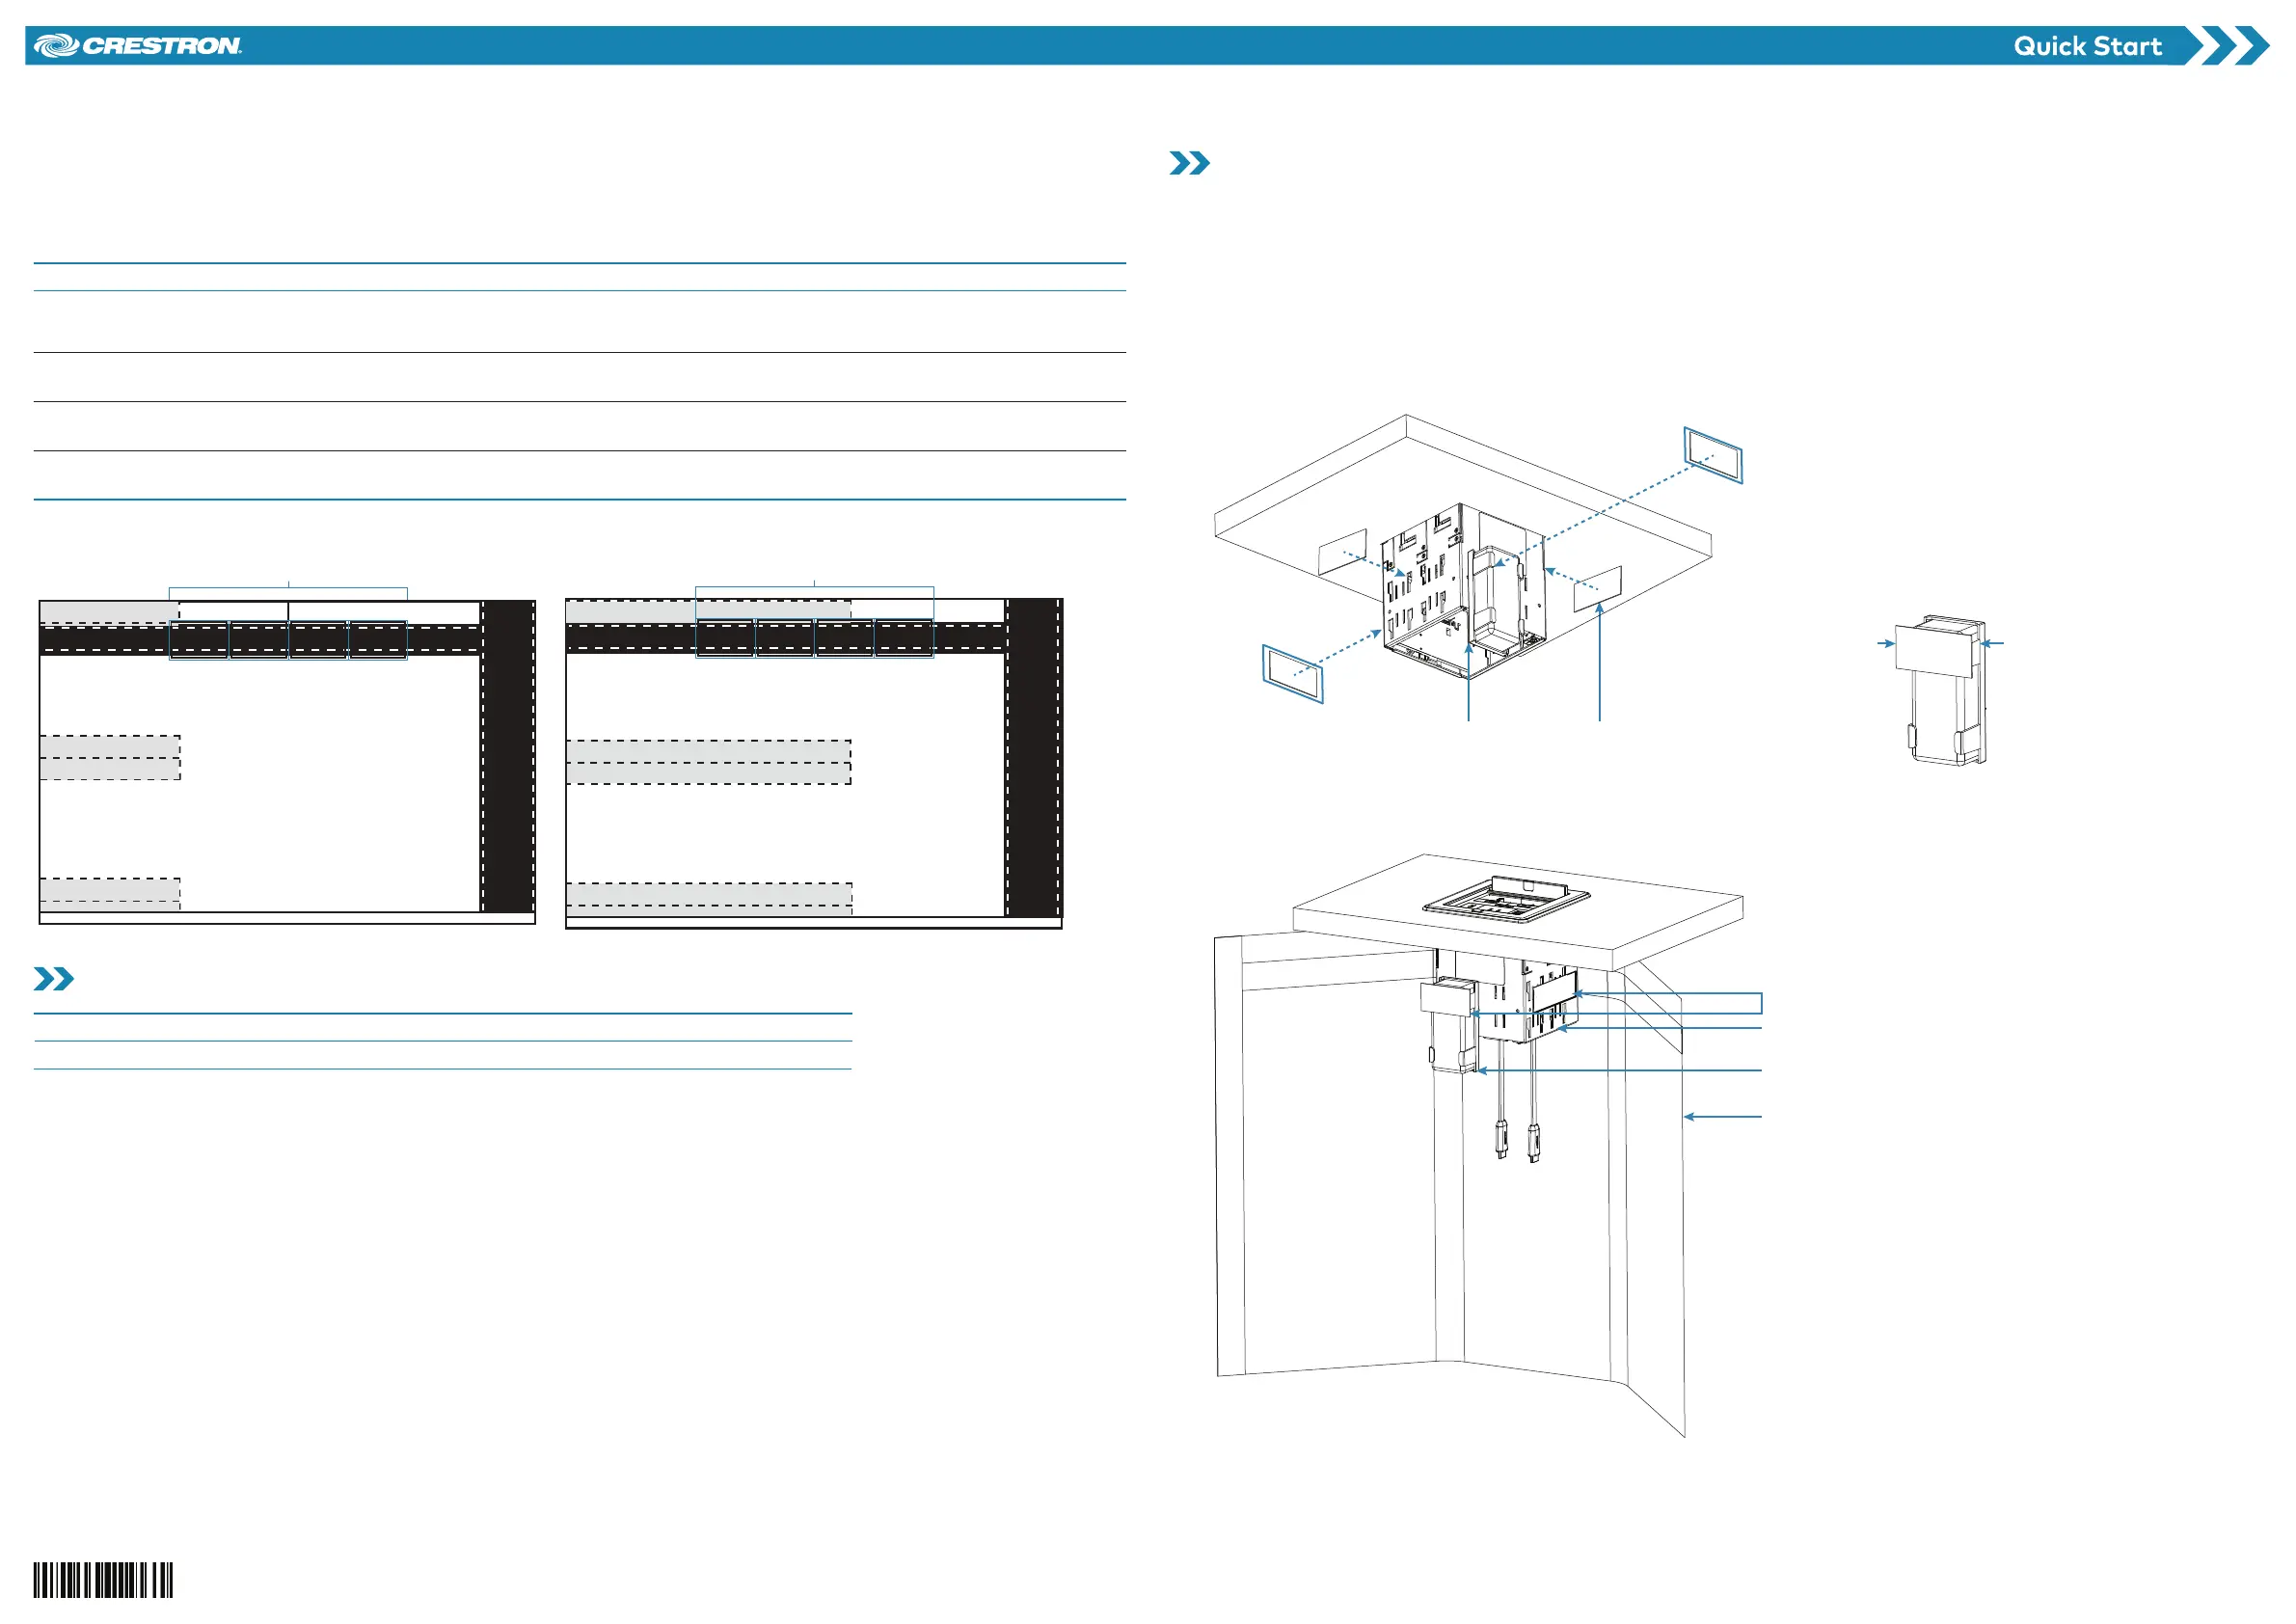
1. Locate the four small strips of hook‑and‑loop fasteners and remove them from the cloak. These four strips shall be applied to the portion
of the FlipTop enclosure that sits beneath the table.
2. Determine the placement of each fastener strip on the FlipTop enclosure. The top of the power supply bracket may be used as a guideline
around the enclosure for fastener placement.
NOTE: A minimum of two strips of hook‑and‑loop fasteners must be used. If only two strips are needed for the installation, place a strip
on the front power supply bracket and on the rear of the of the enclosure. These strips are outlined in blue in the illustration.
Recommended hook-and-loop fastener placement
Hook-and-loop
fastener strips (4)
Power supply
bracket
Power supply
bracket
Hook-and-loop
fastener strip
3. Remove the protective backing from the fastener strips, and press them firmly onto the FlipTop enclosure.
4. Align the inside of the cloak with the hook‑and‑loop fasteners to the fastener strips applied to the FlipTop enclosure.
5. Carefully wrap and press the cloak onto the fastener strips attached to the FlipTop enclosure.
Hook-and-loop fastener strips
Cloak
FlipTop enclosure
Power supply bracket
6. To prevent tangling or cable movement obstruction, ensure that the cables are routed properly within the cloak.
FT2A-UTK-CLOAK Series
Under-Table Cloak for FT2 Series FlipTop™ Cable Management Solutions
Probleemoplossing Crestron FT2A-UTK-CLOAK-WIDE
Als je de handleiding al zorgvuldig hebt gelezen maar geen oplossing voor je probleem hebt gevonden, vraag dan andere gebruikers om hulp
Specificaties
| Merk: | Crestron |
| Categorie: | Niet gecategoriseerd |
| Model: | FT2A-UTK-CLOAK-WIDE |