Indesit IDV 75 S (UK) Handleiding
Hier is de Indesit IDV 75 S (UK) (Wasdroger) gebruikershandleiding. 4 pagina's in taal Engels met een gewicht van 0.9 Mb. Als u geen antwoorden op uw probleem kunt vinden Vraag het onze community.
Pagina 1/4
Instruction booklet
TUMBLE DRYER
WHERE TO INSTALL THE TUMBLE DRYER
10
m
m
15 mm
15 mm
If you are going to install the
appliance under a work counter
be sure to leave a 10 mm space
between the top and any other
objects on or above the machine
and a 15 mm space between the
sides and any kitchen units or
walls to ensure proper air circulation. e dryer must
never be installed behind a lockable door, a sliding
door or a door with a hinge on the opposite side to
that of the dryer door.e appliance must be
installed with the rear surface placed against a wall.
VENTILATION
When the dryer is in use there has to be adequate
ventilation to avoid the back ow of gases into the
room from appliances burning other fuels, including
open res. e vent tube should not exceed 2.4 metres in length.
e tube should be kept clear of the air intake vent and kinks or
‘U’ bends must be avoided as these will obstruct the tube and trap
condensation.
VENTING
Wall mounting
Keep the tube as short and as straight
as possible to prevent condensation
forming in the vent pipe.
e duct in the wall should slope slightly
downwards.
Mounting
e hole should be as low down as
possible and the tube should be kept as
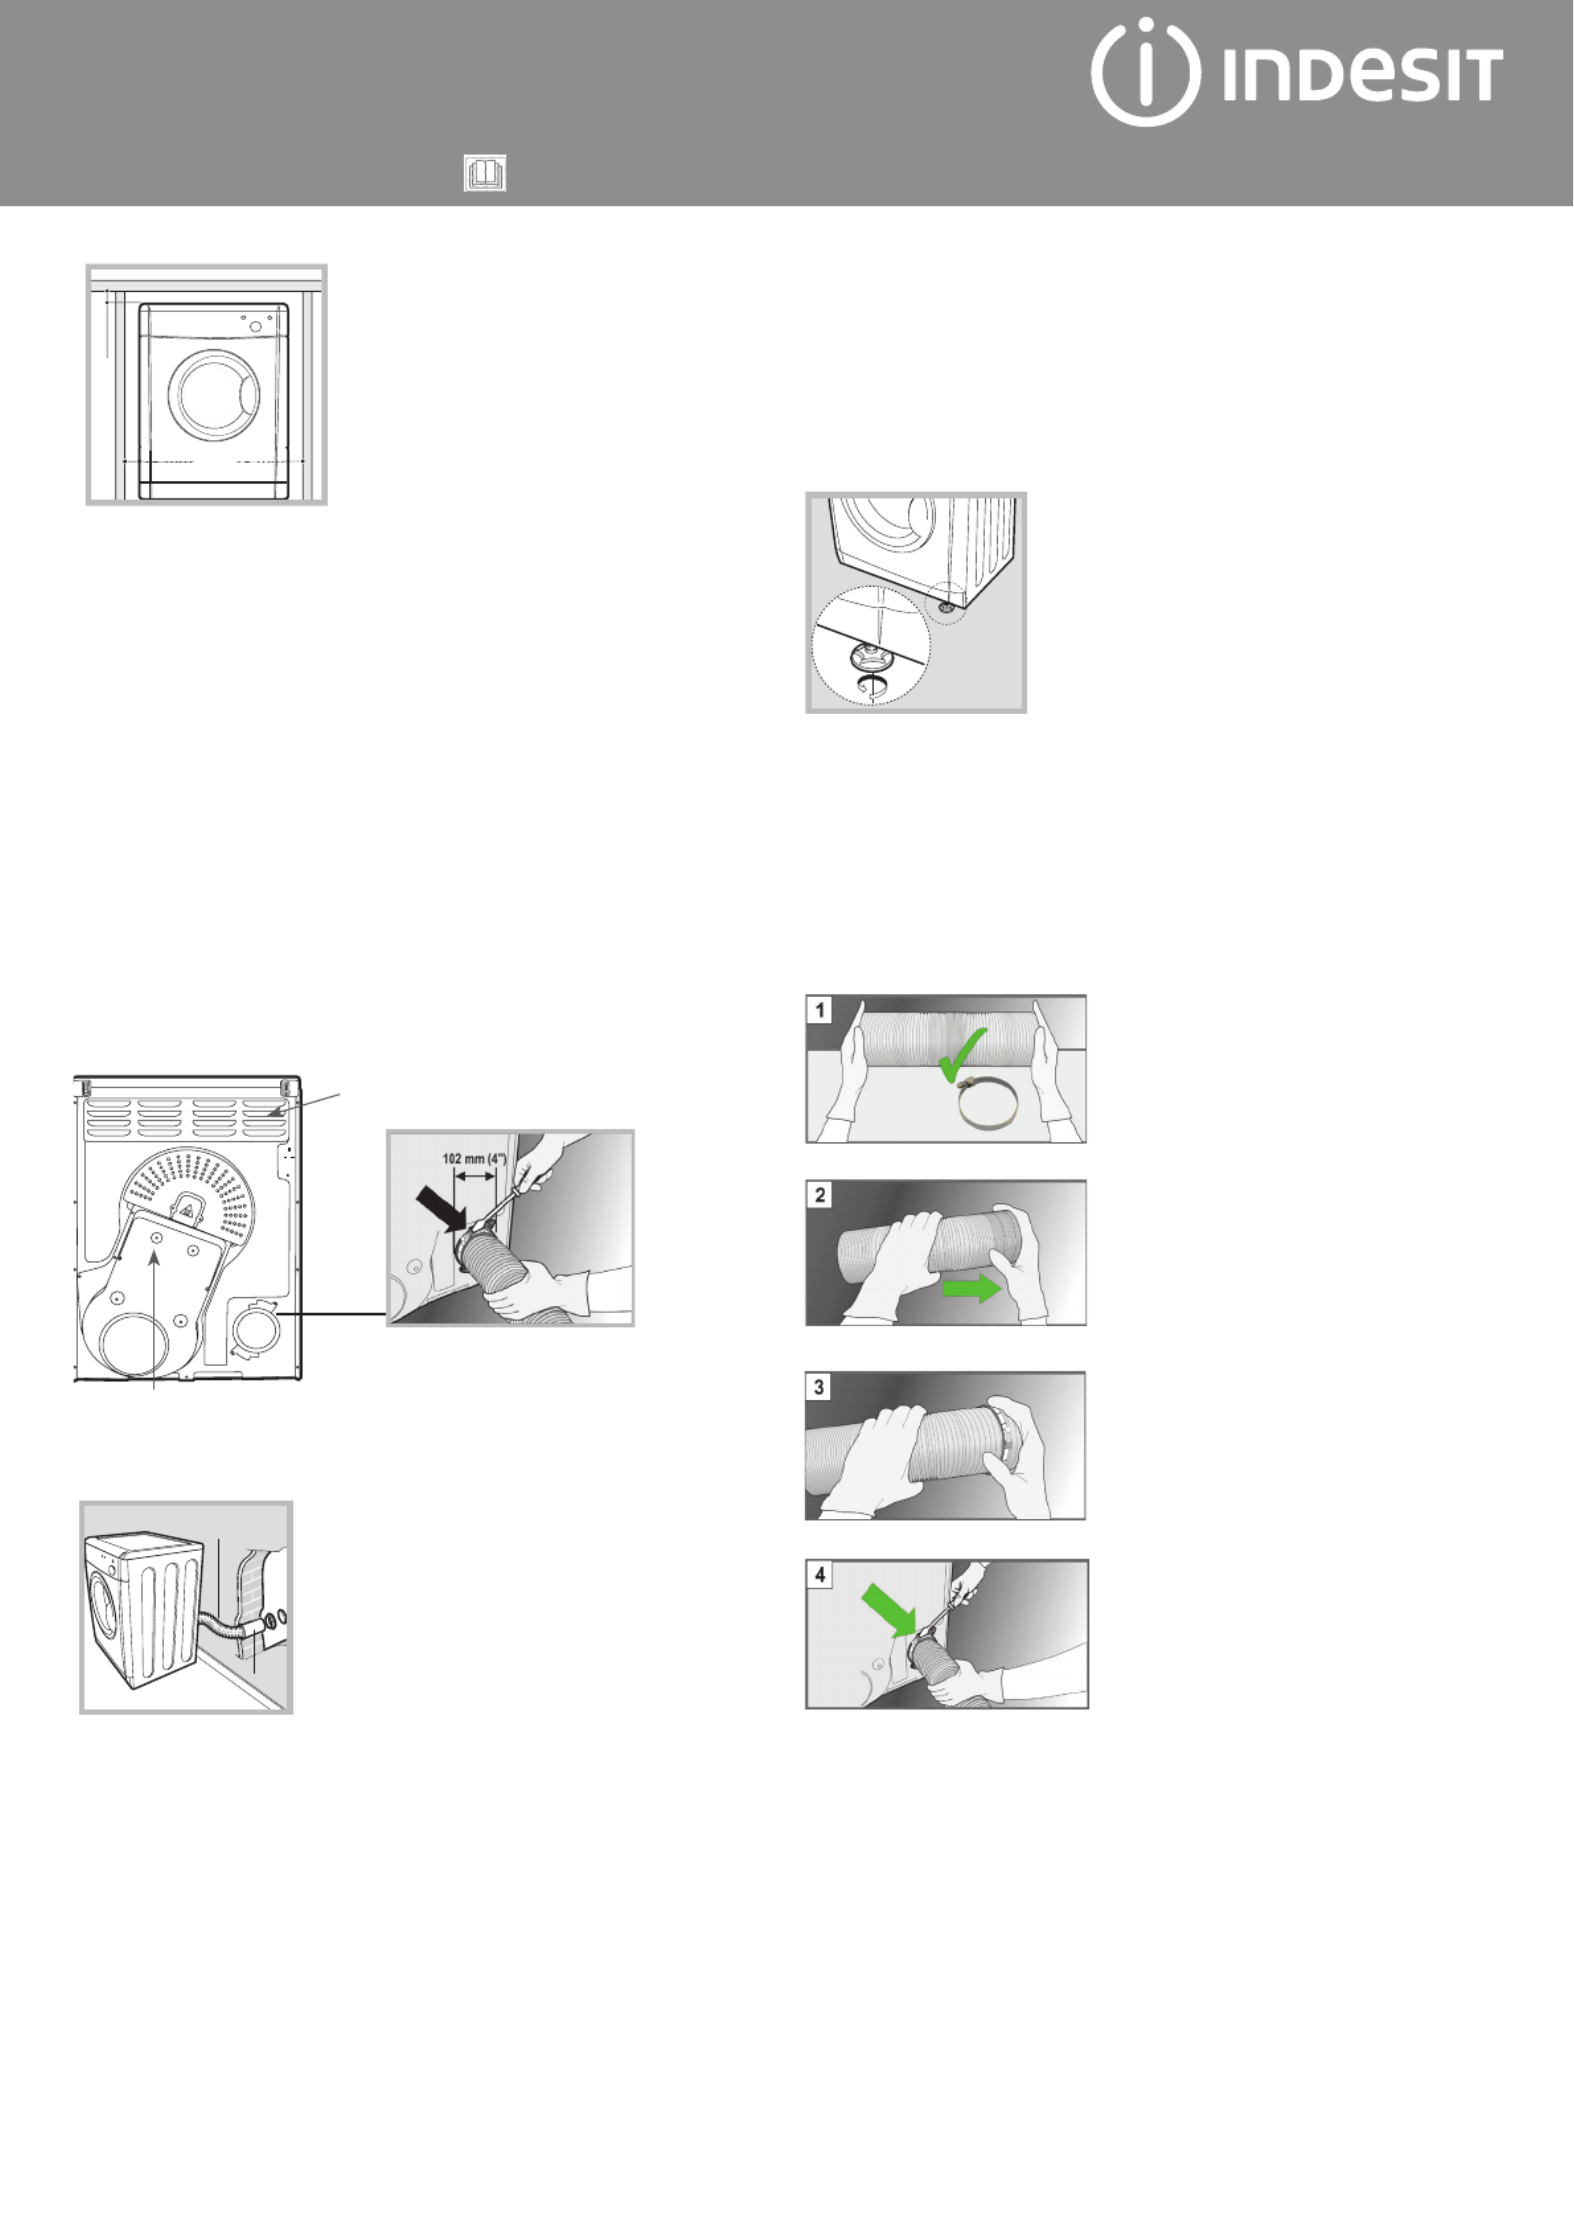
short as possible. Depending on how oen
you use your tumble dryer, it is essential that areas and A B are checked
periodically to remove lint or debris. Make sure that the ventilation hose,
air inlet vents, and outlets are not obstructed or blocked.
Venting
e end of the tube should be directed downwards, to prevent warm
moist air from condensing in the room or dryer.
Do not discharge exhaust air into a ue which is used
for exhaust fumes from other appliances that burn
gas or other fuels.
Do not discharge exhaust air into an extraction system or any duct
with an extractor fan. is will aect the way the thermal controls
operate and can result in a re hazard.
is symbol reminds you to read this booklet.
B
A
ELECTRICAL CONNECTIONS
e socket must be grounded. e power supply cord
should be checked periodically. If the supply cord is
damaged, it must be replaced by the manufacturer,
its service agent or similarly qualied persons in
order to avoid a hazar
LEVELLING YOUR DRYER
e dryer must be installed level for correct
operation. When you have installed your
dryer in its nal location check that it is
rst level side to side and then back to
front.
If the dryer is not level use a wooden block
to support it while adjusting the two front
legs up or down until your dryer is level.
BEFORE YOU START USING YOUR DRYER
Once you have installed your dryer and before you use
it clean the inside of the drum to remove any dust that
could have accumulated during transport.
Air intake vent. Do not block or obstruct
Caution: Hot!
Vent Tube tted here
ITEMS NOT SUITABLE FOR TUMBLE
DRYING
1. Articles that contain rubber or rubber-like materials or plastic lm,
any ammable articles or objects that contain ammable substances.
2. Glass bres.
3. Items which have been dry cleaned.
4. Large bulky items (quilts, sleeping bags, etc). ese expand when
drying and prevent airow through the dryer.
GUIDE TO FITTING THE VENT HOSE TO
YOUR DRYER
Remove ‘oval-shaped’ Ventilation
hose from the packaging.Ensure
that you also remove the two jubilee
clips.If you require to reduce the
length of the hose please wear
gloves when cutting the hose.
Pull to expand the end of the
Ventilation hose prior to fitting.
If the hose has not been expanded,
the jubilee clip will not clamp the
hose to the adaptor.
Place one of the the jubilee clips
over the end of the extended vent
hose.The second jubilee clip can be
used to secure the opposite end of
the vent hose to a wall mounting kit
(not supplied).
Clamp the ventilation hose to the
rear vent outlet by tightening the
jubilee clip with a screwdriver.
If the hose has not been expanded,
the clip will not clamp the hose to
the rear vent outlet.
The tumble dryer may protrude further forward from the worktop.
Please do not push the tumble dryer too far backwar.
Probleemoplossing Indesit IDV 75 S (UK)
Als je de handleiding al zorgvuldig hebt gelezen maar geen oplossing voor je probleem hebt gevonden, vraag dan andere gebruikers om hulp
Specificaties
| Merk: | Indesit |
| Categorie: | Wasdroger |
| Model: | IDV 75 S (UK) |