Intermatic
Niet gecategoriseerd
SH-ABSW-WH
Intermatic SH-ABSW-WH Handleiding
Hier is de Intermatic SH-ABSW-WH (Niet gecategoriseerd) gebruikershandleiding. 3 pagina's in taal met een gewicht van 2,347,220.0 Mb. Als u geen antwoorden op uw probleem kunt vinden Vraag het onze community.
Pagina 1/3
REPLACING THE BATTERY
WARRANTY
One-Year Limited Warranty
Warranties are available by either (a) returning the product to the online dealer or store from where it was
purchased or (b) completing a warranty claim online at www.intermatic.com. This warranty is made by
Intermatic Incorporated, Warranty Department, 1950 Innovation Way, Suite 300, Libertyville, IL 60048.
For warranty or product information please visit www.intermatic.com or call us at 815-675-7000.
WARNINGS/SAFETY
WARNING
• Ingestion Warning: This product contains a button cell or coin battery.
• DEATH or serious injury can occur if ingested.
• A swallowed button cell or coin battery can cause in as little as Internal Chemical Burns
2 hours.
• KEEP OUT OF REACH CHILDREN new and used batteries of .
• Seek immediate medical attention if a battery is suspected to be swallowed or inserted
inside any part of the body.
• Remove and immediately recycle or dispose of used batteries according to local regulations and keep away
from children. Do NOT dispose of batteries in household trash or incinerate.
• Even used batteries may cause severe injury or death.
• Replace only with CR2032 (3V) Battery.
• Call a local poison control center for treatment information.
• Non-rechargeable batteries are not to be recharged.
• Do not force discharge, recharge, disassemble, heat above (manufacturer’s specified temperature rating) or
incinerate. Doing so may result in injury due to venting, leakage or explosion resulting in chemical burns.
• Ensure the batteries are installed correctly according to polarity (+ and -).”
• Do not mix old and new batteries, different brands or types of batteries, such as alkaline, carbon-zinc, or
rechargeable batteries.
• Remove and immediately recycle or dispose of batteries from equipment not used for an extended period of
time according to local regulations.
• Always completely secure the battery compartment. If the battery compartment does not close securely, stop
using the product, remove the batteries, and keep them away from children.
CAUTION
• To prevent danger from explosion or leakage, do not throw battery into fire or expose them to
excessive heat.
• Remove battery when depleted or if the product will be left unused for an extended period of time.
• Always purchase the correct size and grade of battery most suitable for the intended use.
• When installing a new battery, ensure that the orientation is correct with respect to + and - polarity.
• If the connected bulb needs to be removed or exchanged, temporarily remove the ABRA Surface Switch from
the wall and turn the wall switch to the OFF position before unscrewing the bulb.
Care & Maintenance
To clean device, wipe with a soft, damp cloth.
Box Contents
1 ABRA Surface Switch
1 CR2032 Lithium Battery (pre-installed)
1 Paddle-style Mounting Bracket
1 Toggle-style Mounting Bracket
1 Back Plate, for surface mounting and
hand-held remote operation
ABRA Surface Switch
SH-ABSW-WH
Quick Installation and Setup Guide
Libertyville, Illinois 60048
www.intermatic.com
COMPLIANCE
This device complies with part 15 of the FCC. Operation is subject to the following two conditions: (1) this device may
not cause harmful interference, and (2) this device must accept any interference received, including interference that
may cause undesired operation.
FCC NOTE: The manufacturer is not responsible for any radio or TV interference caused by unauthorized modifications
to this equipment. Such modifications could void the user’s authority to operate the equipment.
NOTE: This equipment has been tested and found to comply with the limits for a Class B digital device, pursuant to
Part 15 of the FCC Rules. These limits are designed to provide reasonable protection against harmful interference in a
residential installation. This equipment generates, uses and can radiate radio frequency energy and, if not installed and
used in accordance with the instructions may cause harmful interference to radio communications. However, there is no
guarantee that interference will not occur in a particular installation. If this equipment does cause harmful interference
to radio or television reception, which can be determined by turning the equipment off and on, the user is encouraged to
try to correct the interference by one or more of the following measures:
• Reorient or relocate the receiving antenna.
• Increase the separation between the equipment and receiver.
• Connect the equipment into an outlet on a circuit different from that to which the receiver is connected.
• Consult the dealer or an experienced radio/TV technician for help.
Important note: To comply with the FCC RF exposure compliance requirements, no change to the antenna or the
device is permitted. Any change to the antenna or the device could result in the device exceeding the RF exposure
requirements and void user ’s authority to operate the device.
This Class B digital apparatus complies with ICES-005 of Canada.
DEVICE OVERVIEW
Controls
Button 1 Single Tap, Double Tap, Long Press
Button 2 Single Tap, Double Tap, Long Press
Pairing Mode Press and hold either button for 10 seconds
Note: The functionality of each button press and the devices which it controls are defined by the User
within the Intermatic ABRA app. For example, a single tap of Button 1 might be programmed
to turn all the lights in a room ON, while a single tap of Button 2 might be set up to turn the
lights OFF. Full programming instructions can be found in the Intermatic ABRA App Guide at
Intermatic.com/abra.
GETTING STARTED
Download the App
The Intermatic ABRA app is available on the Google Play Store and the App Store at no cost. Download
the app and follow the directions to create your personal ABRA account.
Switch Connectivity and the ABRA Smart
Plug/Gateway
For optimal reliability and battery life, the ABRA Surface Switch uses Bluetooth
®
Mesh wireless
technology. To connect to your Wi-Fi router, the ABRA Surface Switch requires an ABRA Wi-Fi Smart
Plug with Bluetooth
®
Gateway (SH-ABSP-WH) with Gateway sold separately.
The ABRA Smart Plug/Gateway provides a “bridge” between Wi-Fi and Bluetooth
®
, allowing the
Surface Switch to communicate with Wi-Fi devices like ABRA Smart Bulbs and smart speakers
including Amazon Echo (Alexa), Google, and more. It also serves as a full-featured programmable
smart plug with energy monitoring, scheduling, and countdown features.
Powering and Pairing
Note: It is recommended that you pair the ABRA Surface Switch to your system prior to fastening it to
a wall switch.
1. Plug in and set up the ABRA Smart Plug/Gateway as
outlined in the Quick Installation Guide included with
that product. Find the Plug/Gateway in the Intermatic
ABRA app and select the “Gateway” option, then
tap “Add devices.” The app will start looking for
compatible devices using the built-in
Bluetooth
TM
radio
2. Remove the battery tab from the Surface Switch. The
Status LED will illuminate green for several seconds
then turn off.
3. Press and hold either button on the switch for ten seconds to start the “pairing mode.” The green
LED will slowly flash. When the LED stops flashing, the Plug/Gateway has successfully found the
switch and added it to your network.
4. Configure the ABRA Surface Switch using the Intermatic ABRA app. The switch can be
programmed to turn lights ON and OFF in a room, just like a traditional switch, but it can also be
used to call up custom Lighting Scenes. Full instructions for the app are available at
Intermatic.com/abra.
Press/hold either button for 10 seconds
Battery Tab
Status LED flashes slowly, indicating
“pairing mode”
Press/hold either button for
10 seconds
Note: If for some reason the Surface Switch fails to connect to the Smart Plug/Gateway, the pairing
mode automatically times out after 60 seconds. Press and hold either button on the switch for
ten seconds to re-start the pairing process.
Button 1
Status LED
Button 2
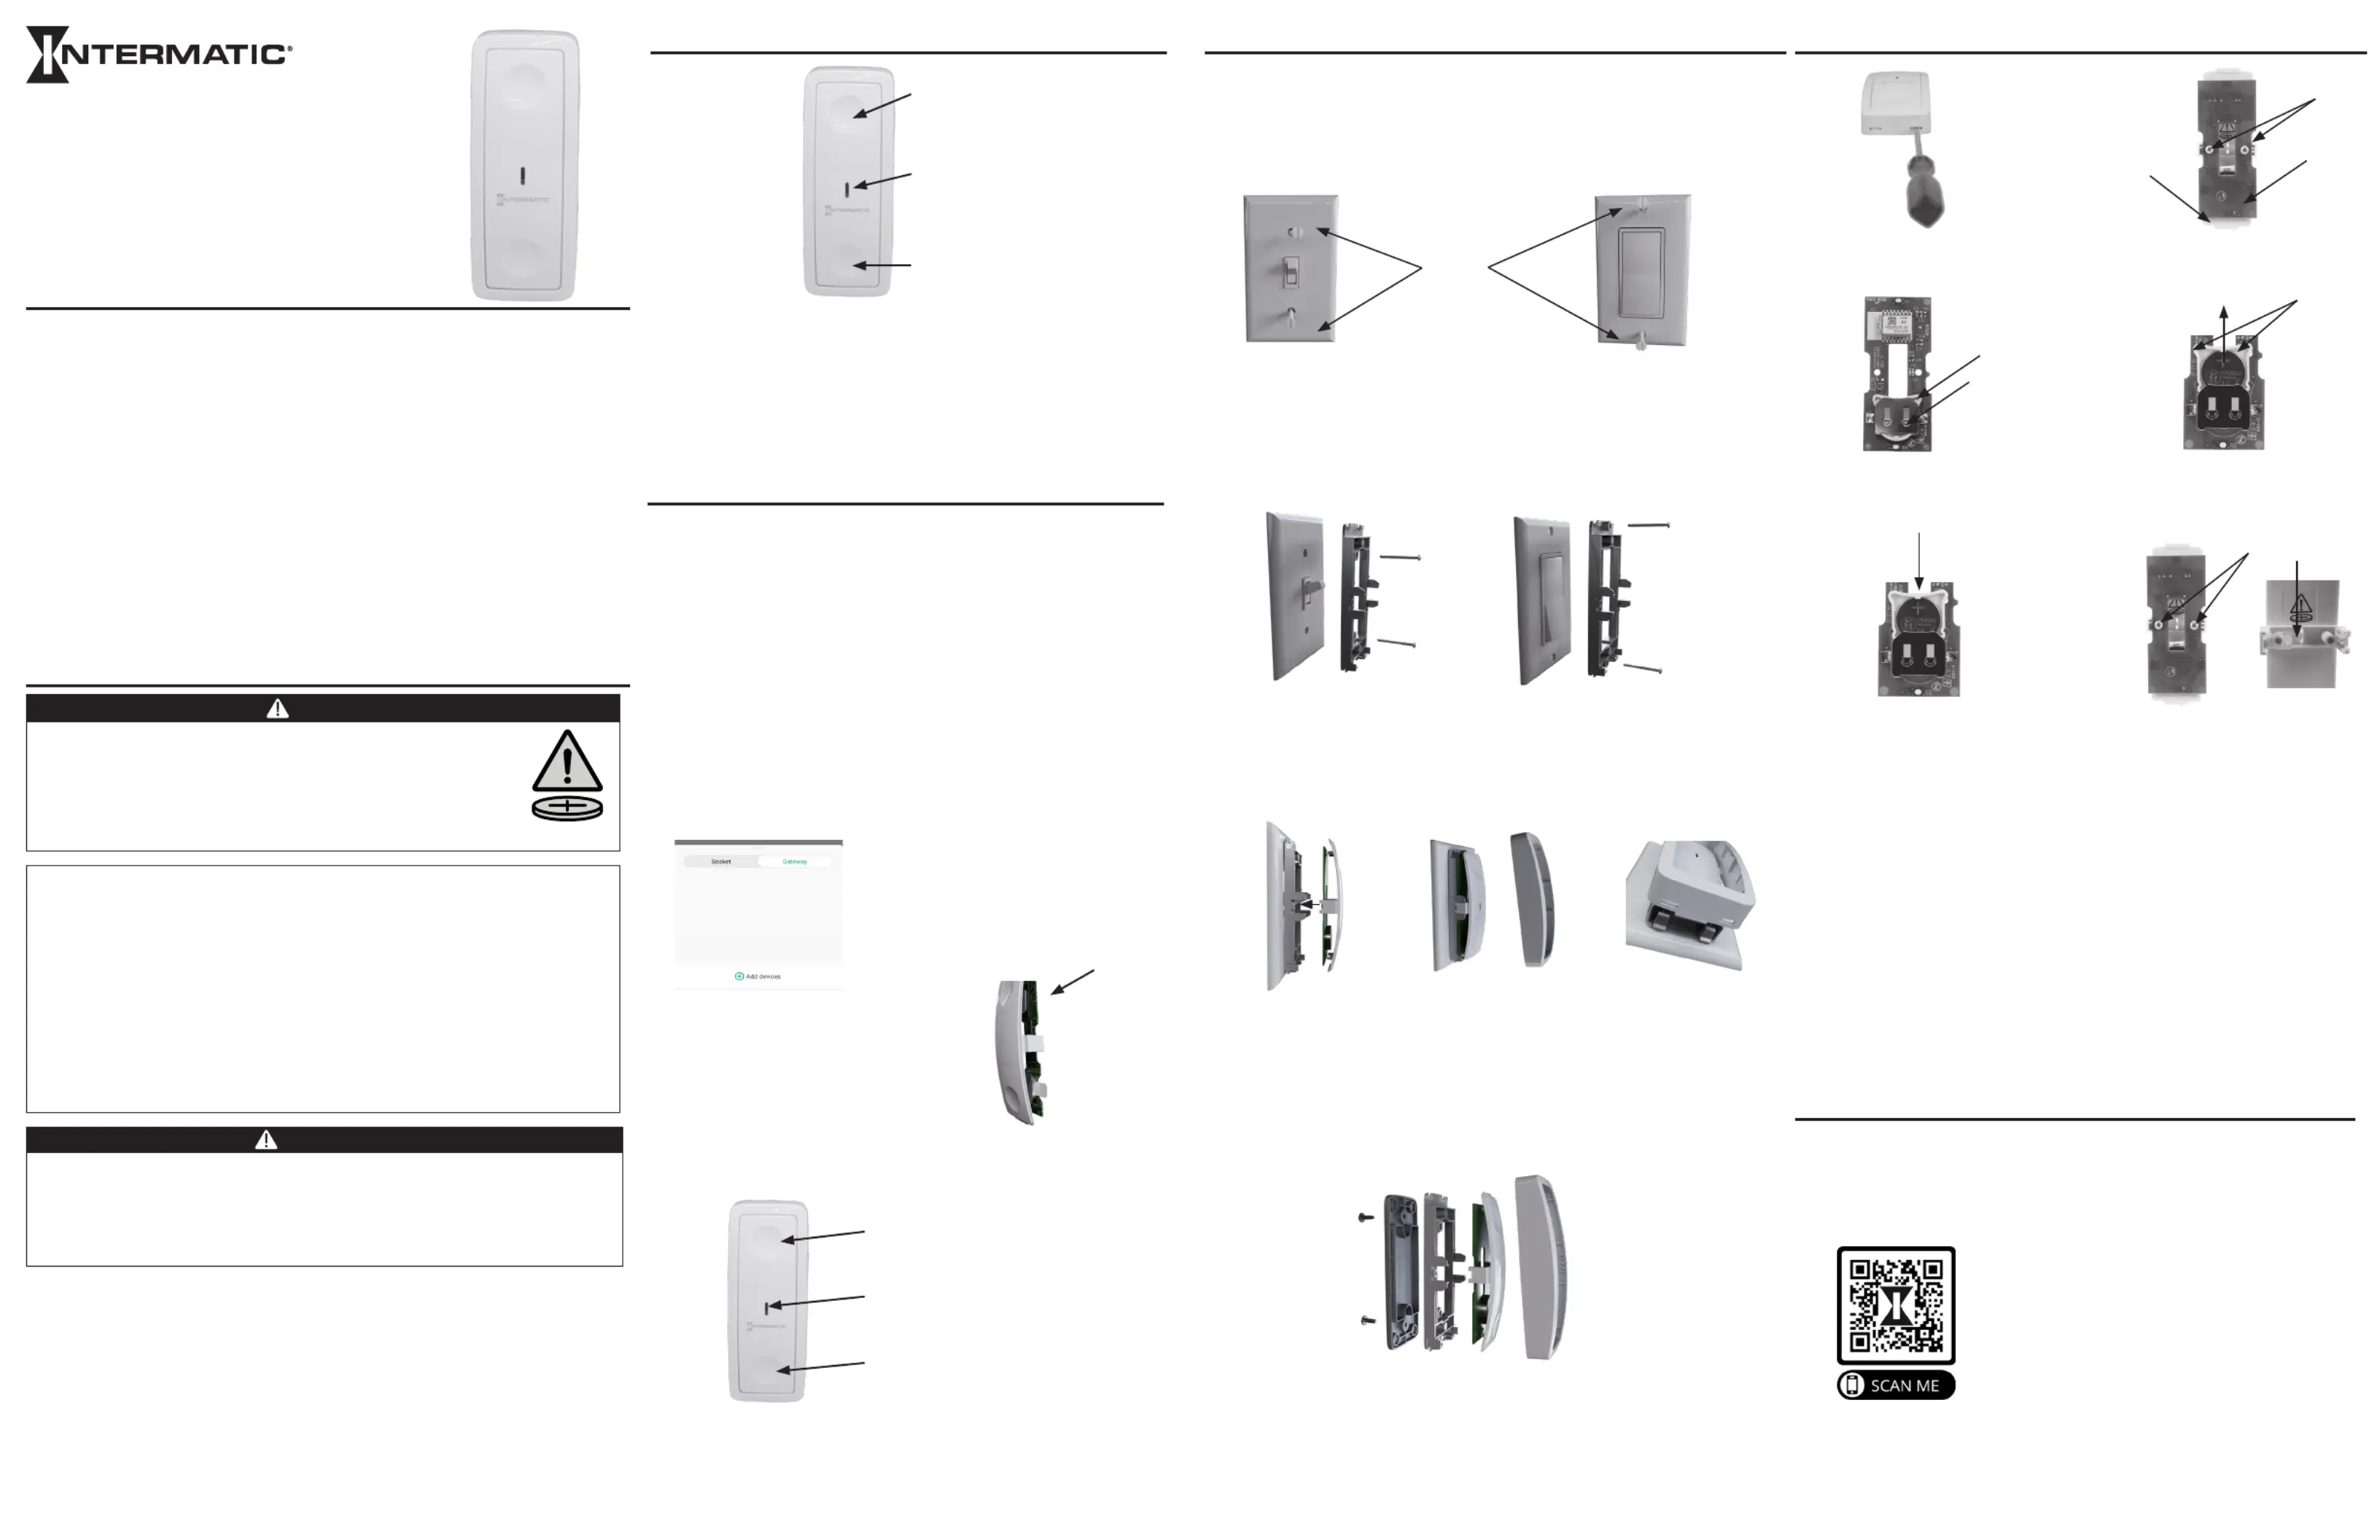
INSTALLATION
Option 1: Over an Existing Wall Switch
1. Turn wall switch OFF.
2. Replace current bulb with an ABRA Smart Bulb.
3. Use a standard flathead screwdriver to remove the faceplate screws from the wall switch, without removing the
faceplate itself.
5. Put the wall switch in the ON position.
6. Align the side tabs of the switch with the slots on the bracket and carefully slide it into place, ensuring that
the Intermatic logo is oriented in the correct face-up position. Then, secure the cover to the Surface Switch
assembly, starting at the top of the switch and pushing downward until the tabs at the bottom of the bracket
snap into the slots in the cover.
Remove
Screws
Toggle-Style Paddle-Style
Option 2: Handheld Remote Control / Surface Mounting
1. Secure the back plate to the toggle-style bracket with the provided tapered screws. Then install the switch
and cover as outlined above, ensuring that the tabs snap firmly into the slots of the switch cover. Once the
switch has been fully assembled, it can be used as a hand-held remote control, or mounted to a wall or other
flat surface using a 3M Command
TM
Strip or similar product (not included). NOTE: It is the User’s responsibility
to ensure that the mounting solution selected can be safely removed from the wall if desired, without causing
paint damage or other undesired results.
Scan this QR code with the camera in your mobile device
and any QR code reader app to get additional technical
information about the SH-ABSW-WH Surface Switch and
the rest of the ABRA product line.
158--02767
Other Things to Keep in Mind
• The ABRA Surface Switch was designed to cover existing wall switches and control connected ABRA
Smart Bulbs. If the existing in-wall device is a dimmer, the results will not be optimal, as dimming
disrupts power to the bulbs. Since all smart bulbs including ABRA require consistent power to function
correctly, it is best to avoid mixing smart bulbs and dimmers. If a dimmer is used, ensure that the
dimming level is set to maximum illumination.
• The ABRA Surface Switch can mount over any standard North American faceplate. However, it was not
designed to be used with “screwless” faceplates or faceplates with contoured or curved surfaces, as
this may prevent the ABRA wall bracket from seating properly.
• In some instances, uneven walls or variables associated with the hard-wired switch may prevent
the existing faceplate from laying perfectly flat against the wall. This can cause the ABRA Surface
Switch cover to disengage or “unsnap” from the bracket after installation. To help prevent this, it is
recommended to loosen the base plate mounting screws by 1/8 of a turn, allowing the bracket to better
conform to the uneven faceplate.
4. There are two brackets in the package; one fits over a traditional toggle-style switch, while the other fits over
a paddle-style switch. Select the appropriate bracket and attach it to the faceplate using the included machine
screws (not the small tapered screws). Note that “TOP” is embossed at the top of the bracket, as a guide for
proper orientation. Be sure to mount the bracket so that “TOP” is at the top of the switch, pointing upward.
2 Faceplate Mounting Screws
2 Back Plate Screws
1 Quick Installation Guide
1. Press on the two plastic tabs at the bottom of the switch
with small flathead screwdriver. Remove the ABRA
Surface Switch cover.
2. Remove switch from wall bracket and place face
down on table. Remove the two Philips screws.
6. Hand-tighten screws to re-attach board to switch plate,
ensuring that the clear plastic light pipe stays in place.
Re-install assembly on wall bracket and snap cover back
in place.
2
4
6
Circuit
Board
Battery
Holder
Battery Tray
Switch
Plate
3. Remove circuit board from switch plate and flip over to
access battery tray.
4. Gently push upward on battery tray corners to slide
tray out. You may use a screwdriver or other tool if
needed. Remove old CR2032 battery and replace
with new battery
5. Slide tray back until it snaps firmly in place
Light Pipe
Probleemoplossing Intermatic SH-ABSW-WH
Als je de handleiding al zorgvuldig hebt gelezen maar geen oplossing voor je probleem hebt gevonden, vraag dan andere gebruikers om hulp
Specificaties
| Merk: | Intermatic |
| Categorie: | Niet gecategoriseerd |
| Model: | SH-ABSW-WH |