Sony
Batterij-oplader
BC-ZD1
Sony BC-ZD1 Handleiding
Hier is de Sony BC-ZD1 (Batterij-oplader) gebruikershandleiding. 2 pagina's in taal met een gewicht van 3,197,750.0 Mb. Als u geen antwoorden op uw probleem kunt vinden Vraag het onze community.
Pagina 1/2
バッテリーチャ−ジャー
Battery Charger
Chargeur de Batteries
充电器
取扱説明書/Operating Instructions/
Mode d’emploi/Manual de instrucciones/
Bedienungsanleitung/Gebruiksaanwijzing/
使用說明書/
使用说明书
BC-ZD1
© 2024 Sony Corporation
Printed in Thailand
https://www.sony.net/
5-062-932- (1)01
電気製品は安全のための注意事項を守らないと、
火災や人身事故になることがあります。
本書には、事故を防ぐための重要な注意事項と製品の取り扱いかたを
示しています。本書をよくお読みのうえ、製品を安全にお使いくださ
い。お読みになったあとは、いつでも見られるところに必ず保管して
ください。
日本国向
注意
水滴のかかる場所など湿気の多い場所やほこり、油煙、湯気の多い場
所では使わない。火災や感電の原因になることがあります。
取り扱い上のご注意
• 本機は、ソニー製“インフォリチウム”バッテリーZシリーズ対応の
充電器です。
• 本機は防じん、防滴、防水仕様ではありません。
• 火災、感電の原因となることがありますので以下にご注意ください。
–分解や改造をしない
–ぬれた手で使用しない
–内部に水や異物(金属類や燃えやすい物など)を入れない
– 水滴のかかる場所など湿気の多い場所やほこり、油煙、湯気の多
い場所では使わない
– 本機を布団などでおおった状態で使わない
– 電源プラグ部は根元まで確実に差し込む
–使用しないときは本機につないだUSBACアダプターなどの外部
電源をコンセントから抜き、保存するときはバッテリーを外す
• 破損や不具合の原因となる場合がありますので以下にご注意くだ
さい。
– 本機は精密機器のため、落としたり、たたいたり、強い衝撃を与え
ない
– 端子部を直接手で触らない
– 高温多湿の場所での使用、保存を避ける
– 強力な磁気や放射線のある場所での使用、保存を避ける
•内部点検や修理は相談窓口にご依頼ください。
•充電するときは、バッテリーを本機にしっかり取り付けてください。
•バッテリーを斜めに取り付けると端子部分を損傷することがあり
ます。
•TVやAMラジオやチューナーの近くで使わないでください。TVやラ
ジオ、チューナーに雑音が入ることがあります。
• 本機をお手入れする際は、柔らかい布で汚れを軽く拭き取ってくだ
さい。シンナー、ベンジンなどの有機溶剤を含むクリーナーは絶対
に使用しないでください。
•CHARGEランプが点灯しないときはバッテリーがしっかり取り付
けられているか確認してください。しっかり取り付けられないと、充
電されないことがあります。
•すでに充電を完了しているバッテリーを取り付けたとき、CHARGE
ランプが 1度点灯してから消えます。
• 長期間使用していないバッテリーを充電する場合は、充電時間が長
くなることがあります。
•万一、水や異物が入ったときは、本機につないだUSBACアダプター
などの外部電源をコンセントから抜いて、ソニーの相談窓口にご相
談ください。
• 通電中の本機、充電中のバッテリーに長時間ふれないでください。
長時間皮膚がふれたままになっていると、低温やけどの原因となる
ことがあります。
充電について
• 必ずソニー製純正バッテリーをお使いください。
•専用バッテリー以外の充電には使わないでください。
•バッテリーはしっかり取り付けてください。
•充電中および充電直後のバッテリーまたは本機は、あたたかくなる
場合があります。
•バッテリー保護のため、充電が完了したら、本機からバッテリーを
取り外してください。
充電するときの温度
周囲温度が0℃〜40℃の範囲で充電できますが、電池の性能を充
分に発揮させるためには、10℃〜30℃での充電をおすすめします。
10℃〜30℃以外では、効率のよい充電ができないことがあります。
記録内容の保証について
万一、本機やバッテリーパックなどの不具合により記録や再生されな
かった場合、記録内容の補償については、ご容赦ください。
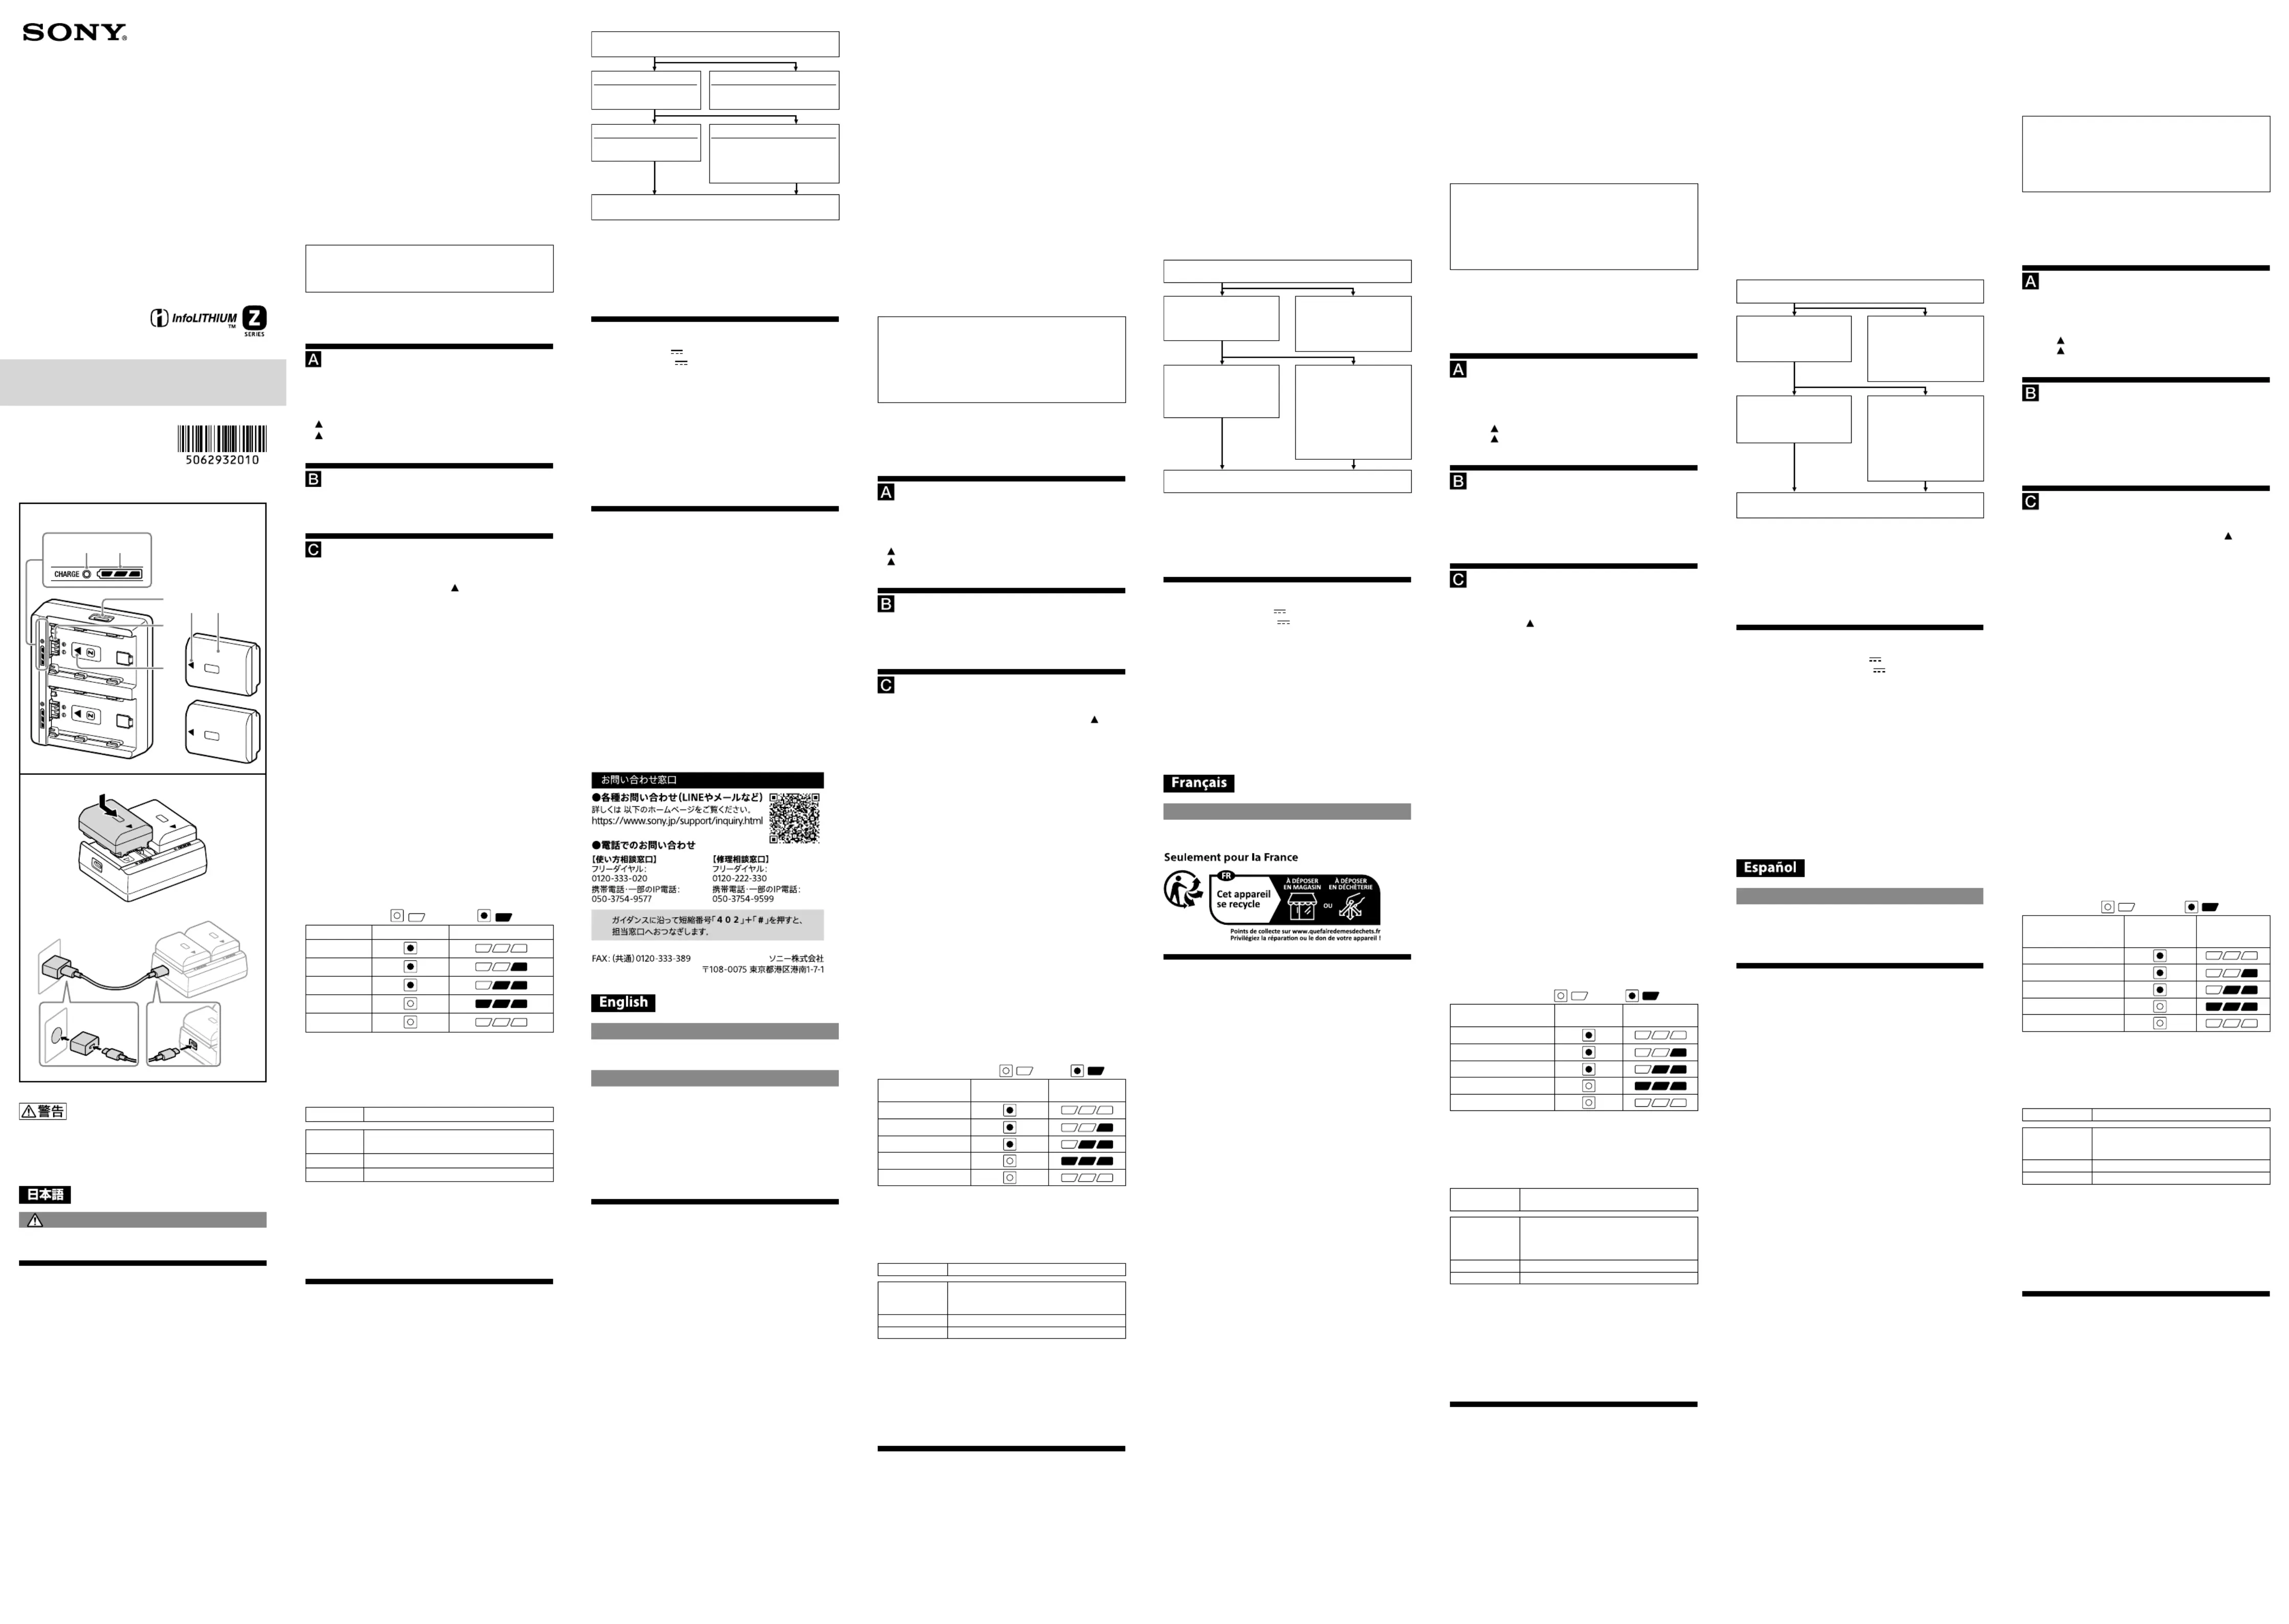
各部の名称
1 CHARGEランプ
2 充電状況お知らせランプ
3
USBType-C™端子
4 バッテリー端子
5
マーク(本機)
6 マーク(バッテリー)
7 バッテリー
準備していただくもの
a市販のUSBType-Cケーブル(USB-C™-USB-C)(3Aに対応したもの)
b市販のUSBACアダプターなどの外部電源(出力30W以上のUSB
PD(USBPowerDelivery)に対応したもの)
バッテリーを充電する
1
バッテリーを取り付ける。
取り付けの際は、バッテリーと本機の マークの方向を合わせて
ください。
2
USB Type-Cケーブルを使って、本機とUSB AC
アダプターなどの外部電源のUSB Type-C端子
をつなぐ。
•お使いのUSBType-CケーブルおよびUSBACアダプターなどの
外部電源によっては、正しく充電できないことがあります。
•バッテリーを2個取り付けた場合は、2 個同時に充電されます。
ランプについて
充電が始まると、CHARGEランプ(オレンジ色)が点灯します。
充電量が90%以上に達すると、CHARGEランプが消灯します。
続けて約30分充電すると、充電状況お知らせランプが消えます。(満充
電)
ご注意
•バッテリーをつかんで、本機を持ち上げないでください。
•バッテリーを取り付けるときなどは、本機にぶつけないよう特にご
注意ください。
•バッテリーを取り付けるときや取り外すときに指をはさまないよう
ご注意ください。
•お使いのUSBACアダプターなどの外部電源によっては、充電が始
まる前にCHARGEランプが点灯と消灯を繰り返すことがあります
が、CHARGEランプまたは充電状況お知らせランプが点灯に変われ
ば、充電動作には問題ありません。
バッテリーを取り外すとき
取り付けたときと反対の方向にスライドさせ、取り外してください。
充電状況お知らせランプで、おおよその充電の状況を確認することが
できます。
、 ・消灯、 、 ・点灯・・ ・・
C RGEランプ 充 況お知らせランプHA 電状
0% - 30%
30 60%% -
60 90%% -
90 満充電% -
満充電完了
充電状況お知らせランプによる充電量表示や、上記の%数値は目安で
す。
周囲温度やバッテリーの状態によっては上記の%数値と異なる場合
があります。
充電時間について
バッテリー NP-FZ100
充電する
バッテリーの数
満充電時間
(使用するUSBACアダプターなどの外部電源の出力)
1個 約155分(18W(9V/2A)以上の場合)
2個 約155分(30W(15V/2A)以上の場合)
•バッテリーを2個同時に充電するとき、出力30W未満のUSBACア
ダプターなどの外部電源(USBPD対応のもの)でも充電が可能です
が、充電時間が長くなることがあります。
• 本機を使用し、使い切ったバッテリーを25℃の室温で充電したと
きの時間です。
•周囲温度やバッテリーの状態、およびお使いのUSBType-Cケーブ
ルやUSBACアダプターなどの外部電源によっては、上記の充電時
間と異なる場合があります。
故障かな?と思ったら
以下に従って確認・点検してください。それでも正常に動作しないと
きは、ソニーの相談窓口にご相談ください。
CHARGEランプには2つの点滅パターンがあります
遅い点滅・・・・・・約1.5秒の点灯と消灯を繰り返す
速い点滅・・・・・・約0.15秒の点灯と消灯を繰り返す
CHARGEランプの点滅パターンによって対処の方法が異なります。
CHARGEランプが遅い点滅を繰り返す場合
充電が一時停止した待機状態になっています。周囲温度やバッテリー
温度が充電に適した温度範囲外になると、自動的に充電が一時停止し
ます。周囲温度やバッテリー温度が充電に適した温度の範囲内に戻る
と、CHARGEランプが点灯し充電が再開されます。バッテリーの充電
は、周囲温度が 10℃〜30℃の環境で行うことをおすすめします。
CHARGEランプが速い点滅を繰り返す場合
以下のような場合、CHARGEランプが速い点滅になる場合があります。
• 非対応のUSBType-CケーブルまたはUSBACアダプターなどの外
部電源をお使いの場合
お使いのUSBType-Cケーブルが3A対応か、またはUSBACアダ
プターなどの外部電源が出力18W以上のUSBPD対応機器かご
確認ください。
• 長期間バッテリーを放置した場合:
• 長期間バッテリーをカメラ本体に取り付けたまま放置した場合:
•お買い上げ直後:
以下の手順に従って確認してください。
充電中のバッテリーを取り外し、もう1度、同じバッテリーを確実に取り
付けてください。
異常があると思われる製品について、ソニーの相談窓口にご相談くだ
さい。
点灯後、再び点滅しなかった場合
充電時間が過ぎてCHARGEランプ
が消えていれば、
異常はありません。
再び点滅した場合
本機に異常があると思われま
す。
点灯後、再び点滅しなかった場合
充電時間が過ぎてCHARGEランプ
が消えていれば、はじめに取り付け
たバッテリーに異常があると思われ
ます。
再び点滅した場合
別のバッテリーを取り付けて
ください。
バッテリーの充電が行われないときは
•USBACアダプターなどの外部電源のプラグをコンセントに正しく
差し込む。または、外部電源が正しく出力されていることを確認す
る。
•USBType-Cケーブルを、本機およびUSBACアダプターなどの外部
電源のUSBType-C端子に正しく差し込む。
• 本機にバッテリーを正しく取り付け直す。
主な仕様
定格入力15V 、2A
定格出力8.4V 、1.6A
動作温度 0℃〜40℃
保存温度 -20℃〜+55℃
外形寸法(約)
84.5mm×29.2mm×70mm(幅×高さ×奥行き)
質量(約) 149g
同梱物 バッテリーチャージャー(BC-ZD1)(1)、印刷物一式
仕様および外観は、改良のため予告なく変更することがありますが、
ご了承ください。
•InfoLITHIUM(インフォリチウム)は、ソニーグループ株式会社の商
標です。
•
USBType-C™およびUSB-C™はUSBImplementersForumの商標
です。
保証書とアフターサービス
保証書
•この製品には保証書が添付されていますので、お買い上げの際、お
受け取りください。
• 所定事項の記入および記載内容をお確かめのうえ、大切に保管して
ください。
アフターサービス
調子が悪いときは
この説明書をもう一度ご覧になってお調べください。
それでも具合が悪いときは
ソニーの相談窓口にご相談ください。
部品の保有期間について
当社では本機の補修用性能部品(製品の機能を維持するために必要な
部品)を、製造打ち切り後最低7年間保有しています。ただし、故障の
状況その他の事情により、修理に代えて製品交換をする場合がありま
すのでご了承ください。保有期間が経過したあとも、故障箇所によっ
ては修理可能の場合がありますので、お買い上げ店か、ソニーの相談
窓口にご相談ください。
WARNING
To reduce fire or shock hazard, do not expose the unit to rain or
moisture.
For Customers in the U.S.A.
For question regarding your product or for the Sony Service
Center nearest you,
call 1-800-222-SONY (7669) .
Supplier’s Declaration of Conformity
Trade Name : SONY
Model : BC-ZD1
Responsible Party : Sony Electronics Inc.
Address : 16535 Via Esprillo, San Diego, CA 92127 U.S.A.
Telephone Number : 858-942-2230
Notes on use
• This unit is designed exclusively for charging up to two packs of
the “InfoLITHIUM” Z series battery manufactured by Sony.
• This unit is not dust-proof, splash-proof, or waterproof.
• To avoid the risk of a fire or an electric shock, observe the
following:
– Do not disassemble or alter this unit.
– Do not use this unit with wet hands.
– Do not allow ingress of water or foreign matters (metal,
flammable substances, etc.) to this unit.
– Do not use this unit in a place subject to water splashes, high
humidity, dust, oil fumes, and steam.
– Do not use this unit while it is covered, for example, by a
blanket.
– Insert the power plug of the USB PD power supply all the way
into a power outlet and make sure that it is securely plugged.
– When you do not intend to use this unit, unplug the USB PD
power supply connected to the unit from the power outlet.
When you intend to store the unit, remove all the battery
packs.
• To avoid the risk of damage or a malfunction, observe the
following:
– This unit is precision equipment. Do not drop the unit, hit it,
or subject it to a strong physical impact.
– Do not touch the electrical contacts on this unit with bare
hands.
– Do not use or store this unit in a place subject to high
temperatures and humidity.
– Do not use or store this unit in a place subject to strong
magnetic energy and/or radiation.
• For interior inspection and repair of this unit, contact your
Sony dealer or local authorized Sony service facility.
• When charging the battery pack, be sure to attach it securely
to this unit.
• Attaching the battery pack at an angle may damage the
electrical contacts.
• Do not use this unit in a vicinity of a TV, an AM radio, or a tuner
to avoid the risk of signal interference that may cause audio noise.
• When cleaning this unit, gently wipe off the soil with a soft
cloth. Do not use a cleaning solution containing organic
solvents, such as thinner, or benzine.
• If the CHARGE lamp does not light up, check if the battery pack
is securely attached to this unit. If it is not properly attached,
charging may not occur.
• When a fully charged battery pack is attached, the CHARGE
lamp lights up once and then goes out.
• It may take longer than stated to charge the battery pack that
is left unused for an extended period of time.
• If water or foreign objects enter this unit, unplug the USB PD
power supply connected to the unit from the power outlet and
contact your Sony dealer or a local authorized Sony service facility.
• While this unit is powered or battery charging is in progress,
do not keep the unit or the battery pack in direct contact with
your skin for an extended period of time to prevent the risk of
low-temperature burns.
Notes on battery charging
• Be sure to use genuine Sony brand battery packs.
• Do not use this unit to charge any battery packs other than the
specified one.
• Make sure that the battery pack is securely attached.
• The battery pack or this unit may become warm during and
immediately after charging.
• For battery pack protection, remove the battery pack from this
unit upon completion of battery charging.
Temperatures adequate for battery charging
This unit is capable of charging the battery pack when the
ambient temperature is within the range from 0 °C to 40 °C
(32 °F to 104 °F). To obtain the most performance out of the
battery pack, however, it is recommended that you charge
the battery pack when the temperature is within the range
from 10 °C to 30 °C (50 °F to 86 °F). Otherwise, efficient battery
charging may not be possible.
Warranty for lost recordings
Please be aware that Sony takes no liability for any loss of
recordings arising from a recording or playback failure due to a
malfunction of any of our products including this unit and the
battery pack.
Identifying the parts
1 CHARGE lamp
2 Charging status indicator lamps
3 USB Type-C® port
4 Battery terminal
5 mark (on this unit)
6 mark (on the battery pack)
7 Battery pack
Items to prepare on your own
a A commercially available USB Type-C cable (USB-C® - USB-C)
that is capable of delivering an electric current of 3 A
b A commercially available USB PD (USB Power Delivery) power
supply that is capable of outputting a power of 30 W or more
To charge the battery pack
1 Attach the battery pack.
When attaching the battery pack, make sure that the marks
on both the battery pack and the unit are aligned in the same
direction.
2 Using a USB Type-C cable, connect the USB
Type-C ports on this unit and a USB PD
power supply.
• Depending on the USB Type-C cable and the USB PD power
supply, proper battery charging may not be possible.
• When two battery packs are attached to this unit, they are
charged simultaneously.
Indications of lamp activities
The CHARGE lamp (orange) lights up and charging begins.
The CHARGE lamp goes out when the battery pack is at least 90%
charged.
The charging status indicator lamps go out after about
30 minutes of continuous charging. (Full charge completed)
Notes
• Do not lift this unit by grasping the battery pack.
• Take extra care not to hit the battery pack against this unit, for
example, when attaching the battery pack.
• Take care not to have your fingers caught when attaching and
removing the battery pack.
• Depending on the USB PD power supply, the CHARGE lamp
may turn on and off repeatedly before charging starts.
However, once the CHARGE lamp or charging status indicator
lamps stay lit, charging will proceed normally.
To remove the battery pack
Remove the battery pack by sliding it in the opposite direction
of attaching the battery pack. You can check the approximate
charging status with the charging status indicator lamps.
, ... Unlit, , ...
Lit
CHARGE lamp
Charging status
indicator lamps
0% - 30%
30% - 60%
60% - 90%
90% - Full charge
Full charge compl edet
The charge level shown by the charging status indicator lamps
and the percentages in the above table are rough guides.
The actual status may vary depending on the ambient
temperature or the condition of the battery pack.
Charging time
Battery pack NP-FZ100
The number
of the battery
packs to charge
Full charging time
(Required output power using the USB PD
power supply)
1 Approx. 155 minutes (18 W (9 V/2 A) or more)
2 Approx. 155 minutes (30 W (15 V/2 A) or more)
• To charge two battery packs simultaneously, you can use a USB
PD power supply that is capable of outputting a power of less
than 30 W, but the charging time may be longer.
• The above charging time is the time required to fully charge the
depleted battery pack using this unit at a room temperature of
25 °C (77 °F).
• The above charging time may vary depending on the ambient
temperature, the condition of the battery pack, the USB Type-C
cable, and the USB PD power supply.
Troubleshooting
Read the following for inspection and troubleshooting. If this
unit still fails to operate after troubleshooting, contact your
Sony dealer or a local authorized Sony service facility.
The CHARGE lamp has two flashing patterns.
Flashes slowly: Lights up and goes out repeatedly about every
1.5 seconds
Flashes quickly: Lights up and goes out repeatedly about every
0.15 seconds
The solution depends on the flashing pattern of the CHARGE
lamp.
The CHARGE lamp keeps flashing slowly.
Battery charging is suspended and this unit is standing by. If
the ambient temperature or the temperature of the battery
pack goes out of the range of temperatures that are adequate
for battery charging, the unit automatically suspends battery
charging. When the ambient temperature or the temperature of
the battery pack goes back into the adequate temperature range,
the CHARGE lamp stops flashing and stays lit to indicate that the
unit has resumed battery charging. It is recommended that you
charge the battery pack when the ambient temperature is within
the range from 10 °C to 30 °C (50 °F to 86 °F).
The CHARGE lamp keeps flashing quickly.
The CHARGE lamp may flash quickly in the following cases.
• An incompatible USB Type-C cable or USB PD power supply is
used.
Check if your USB Type-C cable supports 3 A current and the
USB PD power supply supports an output of 18 W or more.
• The battery pack is left unused for a long period of time.
• The battery pack is installed in the camera and left unused for a
long period of time.
• The battery pack is charged for the first time after purchase.
Follow the flowchart below to find out what to do.
Please contact your nearest Sony dealer regarding the product
that may have a problem.
Remove the battery pack that is being charged, and then attach it
securely back in place.
The CHARGE lamp flashes
again:
Replace the battery pack with
a new one.
The CHARGE lamp lights up
and does not flash again:
If the CHARGE lamp goes out
after the charging time has
passed, there is no problem.
The CHARGE lamp flashes
again:
It is suspected that there is
something wrong with this
unit.
The CHARGE lamp lights up
and does not flash again:
If the CHARGE lamp goes
out after the charging time
has passed, it is suspected
that there is something
wrong with the battery
pack attached before the
replacement.
This unit fails to charge the battery pack.
• Plug the USB PD power supply properly to a power outlet; or
check if the USB PD power supply is properly outputting power.
• Plug the USB Type-C cable into the USB Type-C ports on this
unit and the USB PD power supply.
• Remove the battery pack and attach it properly back in place.
Specifications
Input rating 15 V , 2 A
Output rating 8.4 V , 1.6 A
Operating temperature 0 °C to 40 °C (32 °F to 104 °F)
Storage temperature –20 °C to +55 °C (–4 °F to +131 °F)
Dimensions (Approx.) 84.5 mm × 29.2 mm × 70 mm (3 3/8 in. ×
1 3/16 in. × 2 7/8 in.) (W/H/D)
Mass (Approx.) 149 g (5.3 oz)
Included items Battery Charger (BC-ZD1) (1), Set of
printed documentation
Design and specifications are subject to change without notice.
• InfoLITHIUM is a trademark of Sony Group Corporation.
• USB Type-C® and USB-C® are registered trademarks of
USB Implementers Forum.
AVERTISSEMENT
Afin de réduire les risques d’incendie ou de décharge électrique,
n’exposez pas cet appareil à la pluie ou à l’humidité.
Remarques sur l’emploi
• Cet accessoire a été conçu exclusivement pour charger jusqu’à
deux batteries de la série « InfoLITHIUM » Z fabriquée par Sony.
• Cet accessoire n’est pas étanche à la poussière, aux
éclaboussures d’eau ou à l’eau.
• Pour éviter tout risque d'incendie ou d'électrocution, observez
les points suivants :
– Ne démontez ni ne modifiez pas cet accessoire.
– N'utilisez pas cet accessoire avec les mains mouillées.
– Ne faites pas pénétrer de l'eau ou des corps étrangers
(métal, matières inflammables, etc.) à l'intérieur de cet
accessoire.
– N'utilisez pas cet accessoire dans un endroit exposé à des
éclaboussements d'eau, un taux d'humidité élevé, des
poussières, des émanations d'huile et la vapeur.
– N’utilisez pas cet accessoire lorsqu’il est recouvert, p. ex. par
une couverture.
– Veillez à brancher correctement la fiche d’alimentation de
l’alimentation USB PD dans une prise de courant.
– Lorsque vous ne comptez pas utiliser cet accessoire,
débranchez l’alimentation USB PD connectée à l’accessoire
de la prise de courant. Si vous souhaitez stocker l’accessoire,
retirez toutes les batteries.
• Pour éviter tout risque d'endommagement ou de
dysfonctionnement, observez les points suivants :
– Cet accessoire est un dispositif de précision. Ne le laissez pas
tomber ou ne le heurtez pas ; évitez également qu'il subisse
un choc physique violent.
– Ne touchez pas les contacts électriques de cet accessoire à
mains nues.
– N'utilisez ni ne rangez pas cet accessoire à un endroit exposé
à des températures ou un taux d'humidité élevés.
– Veuillez ne pas utiliser ou stocker cet accessoire dans un
endroit exposé à une forte énergie magnétique et/ou à des
radiations.
• Pour réaliser une réparation ou inspection à l'intérieur de
cet accessoire, contactez le distributeur Sony ou le centre de
service Sony agréé le plus proche.
• Lors du chargement de la batterie, veillez à la fixer solidement
à cet accessoire.
• Le fait de fixer la batterie au niveau d’un angle peut
endommager les contacts électriques.
• N’utilisez pas cet accessoire à proximité d’un téléviseur,
d’une radio AM ou d’un syntoniseur pour éviter tout risque
d’interférence de signal susceptible de provoquer des bruits
audio parasites.
• Pour nettoyer l’accessoire, ôtez délicatement la saleté avec un
chiffon doux. N’utilisez pas de solution nettoyante contenant
des solvants organiques, tels que des diluants ou de l’essence.
• Si le témoin CHARGE ne s’allume pas, veillez à ce que la
batterie soit bien insérée dans cet accessoire. Si cette dernière
n’est pas correctement insérée, le chargement ne peut pas
débuter.
• En cas d’insertion d’une batterie complètement chargée, le
témoin CHARGE s’allume une fois puis s’éteint.
• Le chargement d’une batterie rechargeable qui n’a pas été
utilisée pendant une période prolongée peut prendre plus de
temps que prévu.
• Si de l’eau ou des corps étrangers pénètrent dans cet
accessoire, débranchez l’alimentation USB PD connectée à
l’accessoire de la prise de courant et contactez votre revendeur
Sony ou un centre de service Sony local agréé.
• Lorsque cet accessoire est alimenté ou que le chargement de
la batterie est en cours, ne laissez pas l’accessoire ou la batterie
rechargeable en contact direct avec votre peau pendant une
période prolongée afin d’éviter tout risque de brûlure à basse
température.
Remarques relatives au chargement de la batterie
• Assurez-vous d’utiliser des batteries rechargeables Sony d’origine.
• N’utilisez pas cet accessoire pour charger une batterie
rechargeable différente de celle spécifiée.
• Veillez à ce que la batterie rechargeable soit bien insérée.
• La batterie et cet accessoire peuvent devenir chauds pendant
ou immédiatement après la charge.
• Pour protéger la batterie rechargeable, retirez la batterie
rechargeable de cet accessoire une fois cette dernière
complètement chargée.
Températures adéquates pour un chargement de batterie
Cet accessoire est capable de charger la batterie rechargeable
lorsque la température ambiante est comprise entre 0 °C et
40 °C (32 °F et 104 °F). Pour maximiser les performances de
labatterie rechargeable, il est toutefois recommandé de la
charger lorsque la température est comprise entre 10 °C et
30 °C (50 °F et 86 °F). Dans le cas contraire, la batterie pourrait
ne pas charger correctement.
Garantie relative aux enregistrements perdus
Veuillez noter que Sony ne saura être tenue responsable
en cas de perte d’enregistrements résultant d’un échec
d’enregistrement ou de lecture dû à un dysfonctionnement
de l’un de ses produits, y compris cet accessoire et la batterie
rechargeable.
Identification des éléments
1 Témoin CHARGE
2 Témoins d’état de charge
3 Port USB Type-C®
4 Borne de batterie
5 Marque (sur cet appareil)
6 Marque (sur la batterie)
7 Batterie rechargeable
Éléments à préparer vous-
même
a Câble USB Type-C disponible dans le commerce (USB-C®-
USB-C) pouvant fournir un courant électrique de 3 A
b Alimentation USB PD (alimentation USB) disponible dans le
commerce garantissant une puissance d’au moins 30 W
Pour charger la batterie
1 Insérez la batterie rechargeable.
Lorsque vous insérez la batterie rechargeable, veillez à ce
que les marques
situés sur la batterie rechargeable et
l’accessoire soient alignées dans la même direction.
2 À l’aide d’un câble USB Type-C, connectez
le port USB Type-C à cet accessoire et une
alimentation USB PD.
• Selon le câble USB Type-C et l’alimentation USB PD utilisés,
la batterie pourrait ne pas charger correctement.
• Lorsque deux batteries rechargeables sont insérées dans cet
accessoire, celles-ci sont chargées simultanément.
Indications des activités de la lampe
Le témoin CHARGE (orange) s’allume et la charge commence.
Le témoin CHARGE s’éteint lorsque la batterie rechargeable est
chargée à au moins 90%.
Les témoins d’état de charge s’éteignent après environ
30 minutes de chargement continu. (Charge complète terminée)
Remarques
• Ne soulevez pas cet accessoire en le saisissant par la batterie
rechargeable.
• Veillez à ne pas heurter la batterie rechargeable contre cet
accessoire, par exemple, lors de l’insertion de la batterie
rechargeable.
• Veillez à ne pas vous pincer les doigts lorsque vous insérez ou
retirez la batterie rechargeable.
• En fonction de l'alimentation USB PD, le témoin CHARGE
peut s'allumer et s'éteindre à plusieurs reprises avant que le
chargement ne commence. Toutefois, une fois que le témoin
CHARGE ou que les témoins d’état de charge restent allumés,
le chargement se fait normalement.
Pour retirer la batterie rechargeable
Retirez la batterie rechargeable en la faisant glisser dans le sens
opposé de l’insertion. Vous pouvez vérifier l’état approximatif de
la charge avec les témoins d’état de charge.
, ... Éteint, , ...
Allumé
Témoin CHARGE
Témoins d’état
de charge
0% - 30%
30% - 60%
60% - 90%
90% - Charge complète
Charge complète terminée
Le niveau de charge indiqué par les témoins d’état de charge et
les pourcentages dans le tableau ci-dessus sont approximatifs.
Le statut actuel peut varier selon la température ambiante ou
l’état de la batterie rechargeable.
Temps de charge
Batterie
rechargeable
NP-FZ100
Nombre de
batteries
rechargeables à
charger
Temps de charge complète
(Puissance de sortie avec l’alimentation
USB PD)
1 Environ 155
minutes (18 W (9 V/2 A) ou plus)
2 Environ 155 minutes (30 W (15 V/2 A) ou plus)
• Afin de charger deux batteries rechargeables simultanément,
vous pouvez utiliser une alimentation USB PD capable de
fournir une puissance inférieure à 30 W, mais le temps de
charge peut être plus long.
• Le temps de charge ci-dessus correspond au temps nécessaire
pour charger complètement une batterie rechargeable vide à l’aide
de cet accessoire à une température ambiante de 25 °C (77 °F).
• Le temps de charge indiqué ci-dessus peut varier en
fonction de la température ambiante, de l’état de la batterie
rechargeable, du câble USB Type-C et de l’alimentation USB PD.
Dépannage
Lisez les informations suivantes relatives à l’inspection et au
dépannage. Si cet accessoire ne fonctionne toujours pas après
avoir procédé au dépannage, contactez votre revendeur Sony ou
un centre de service Sony agréé local.
Le témoin CHARGE a deux modes de clignotement.
Clignotement lent : s’allume et s’éteint plusieurs fois toutes les
1,5 seconde
Clignotement rapide : s’allume et s’éteint plusieurs fois toutes les
0,15 seconde
La solution dépend du mode de clignotement du témoin CHARGE.
Le témoin CHARGE continue de clignoter lentement.
La charge de la batterie est suspendue et cet accessoire est en
attente. Si la température ambiante ou la température de la
batterie rechargeable se situe hors de la plage de températures
appropriées pour le chargement de la batterie, l’accessoire
suspend automatiquement le chargement de la batterie. Lorsque
la température ambiante ou la température de la batterie revient
dans la plage de températures adéquate, le témoin CHARGE
cesse de clignoter et reste allumé pour indiquer que l’accessoire
a recommencé à charger la batterie. Il est conseillé de charger
la batterie rechargeable lorsque la température ambiante est
comprise entre 10 °C et 30 °C (50 °F et 86 °F).
Le témoin CHARGE continue de clignoter
rapidement.
Le témoin CHARGE peut clignoter rapidement dans les cas
suivants.
• Un câble USB Type-C incompatible ou une alimentation USB PD
incompatible a été utilisé(e).
Veillez à ce que votre câble USB Type-C supporte le courant
3 A et que l’alimentation USB PD supporte une sortie d’au
moins 18 W.
• La batterie rechargeable n’est pas utilisée pendant une longue
période.
• La batterie rechargeable est insérée dans l’appareil photo et
n’est pas utilisée pendant une longue période.
• La batterie rechargeable est chargée pour la première fois
après l’achat.
Suivez l’organigramme suivant pour obtenir la marche à
suivre.
Veuillez contacter votre revendeur Sony le plus proche pour le
produit pouvant être défectueux.
Retirez la batterie rechargeable en cours de charge, puis
insérez-la correctement.
Le témoin CHARGE clignote
à nouveau :
Remplacez la batterie
rechargeable par une neuve.
Le témoin CHARGE s’allume
et ne clignote plus :
Si le témoin CHARGE s’éteint
une fois le temps de charge
écoulé, cela n’est pas un
problème.
Le témoin CHARGE clignote
à nouveau :
Il peut y avoir un problème
avec cet accessoire.
Le témoin CHARGE s’allume
et ne clignote plus :
Si le témoin CHARGE s’éteint
une fois le temps de charge
écoulé, il peut y avoir un
problème au niveau de la
batterie rechargeable installée
avant le remplacement.
Cet accessoire ne parvient pas à charger la
batterie rechargeable.
• Branchez correctement l’alimentation USB PD à une prise de
courant ou vérifiez que l’alimentation USB PD est correctement
alimentée.
• Branchez le Câble USB Type-C dans les ports USB Type-C de cet
appareil et de l’alimentation USB PD.
• Retirez la batterie rechargeable et insérez-la correctement.
Spécifications
Puissance nominale d'entrée 15 V , 2 A
Puissance nominale de sortie 8,4 V , 1,6 A
Température de
fonctionnement
0 °C à 40 °C (32 °F à 104 °F)
Température d’entreposage –20 °C à +55 °C (–4 °F à +131 °F)
Dimensions (environ) 84,5 mm × 29,2 mm × 70 mm
(3 3/8 po. × 1 3/16 po. × 2 7/8 po.)
(L/H/P)
Poids (environ) 149 g (5,3 oz.)
Articles inclus Chargeur de batteries (BC-ZD1) (1),
Jeu de documents imprimés
La conception et les spécifications peuvent être modifiées sans
préavis.
• InfoLITHIUM est une marque commerciale de
Sony Group Corporation.
• USB Type-C® et USB-C® sont des marques déposées de
USB Implementers Forum.
AVISO
Para reducir el riesgo de incendio o descarga eléctrica, no
exponga la unidad a la lluvia ni a la humedad.
Nombre del producto: Cargador de baterías
Modelo: BC-ZD1
Notas sobre la utilización
• Esta unidad está diseñada exclusivamente para cargar hasta
dos baterías de la serie “InfoLITHIUM” Z fabricadas por Sony.
• Esta unidad no es resistente al polvo, las salpicaduras, ni el
agua.
• Para evitar riesgos, como un incendio o una descarga eléctrica,
observe lo siguiente:
– No desarme ni modifique esta unidad.
– No utilice esta unidad con las manos húmedas.
– No permita la entrada de agua ni materias extrañas (metal,
sustancias inflamables, etc.) en esta unidad.
– No utilice esta unidad en un lugar sujeto a salpicaduras de
agua, alta humedad, polvo, humos de aceite, y vapor.
– No utilice esta unidad mientras esté cubierta, por ejemplo,
por una manta.
– Inserte completamente el enchufe de alimentación del
suministro de alimentación USB PD en una toma de corriente
y asegúrese de que esté bien enchufado.
– Cuando no vaya a utilizar esta unidad, desenchufe el
suministro de alimentación USB PD conectado a la unidad
de la toma de corriente. Cuando desee almacenar la unidad,
retire todas las baterías.
• Para evitar el riesgo de daños o un mal funcionamiento,
observe lo siguiente:
– Esta unidad es un equipo de precisión. No deje caer la
unidad, no la golpee, ni la someta a un fuerte impacto físico.
– No toque los contactos eléctricos de esta unidad con las
manos desnudas.
– No utilice ni almacene esta unidad en un lugar sujeto a altas
temperaturas y humedad.
– No utilice ni guarde esta unidad en un lugar sometido a una
fuerte energía magnética y/o radiación.
• Para la inspección y reparación interior de esta unidad,
póngase en contacto con su distribuidor Sony o con el servicio
técnico local autorizado por Sony.
• Al cargar la batería, asegúrese de instalarla firmemente a esta
unidad.
• Instalar la batería en ángulo puede dañar los contactos
eléctricos.
• No utilice esta unidad cerca de un televisor, una radio AM o un
sintonizador para evitar el riesgo de interferencia de la señal
que pueda causar ruido de audio.
• Al limpiar esta unidad, limpie suavemente la suciedad con un
paño suave. No utilice una solución de limpieza que contenga
disolventes orgánicos, como diluyente o bencina.
• Si la lámpara CHARGE no se enciende, compruebe si la batería
está firmemente instalada en esta unidad. Si no está instalada
correctamente, puede que no se produzca la carga.
• Cuando haya instalada una batería completamente cargada, la
lámpara CHARGE se encenderá una vez y después se apagará.
• La batería que se deja sin usar durante un periodo de tiempo
prolongado puede tardar más de lo indicado en cargarse.
• Si entra agua u objetos extraños en esta unidad, desconecte
de la toma de corriente el suministro de alimentación USB
PD conectado a la unidad y póngase en contacto con su
distribuidor Sony o con un centro de servicio técnico local
autorizado de Sony.
• Mientras esta unidad esté encendida o se esté cargando la
batería, no mantenga la unidad o la batería en contacto directo
con la piel durante un período prolongado para evitar el riesgo
de quemaduras por baja temperatura.
Notas sobre la carga de la batería
• Asegúrese de utilizar baterías originales de la marca Sony.
• No utilice esta unidad para cargar una batería distinta de la
especificada.
• Asegúrese de que la batería esté bien instalada.
• La batería o esta unidad pueden calentarse durante e
inmediatamente después de la carga.
• Para proteger la batería, retírela de esta unidad una vez
finalizada la carga.
Temperaturas adecuadas para la carga de baterías
Esta unidad es capaz de cargar la batería cuando la temperatura
ambiente está dentro del intervalo de 0 °C a 40 °C. Sin
embargo, para obtener el máximo rendimiento de la batería, se
recomienda que cargue la batería cuando la temperatura esté
dentro del intervalo de 10 °C a 30 °C. De lo contrario, puede que
no sea posible una carga eficiente de la batería.
Garantía para grabaciones perdidas
Tenga en cuenta que Sony no se hace responsable de ninguna
pérdida de grabaciones derivada de un fallo de grabación o
reproducción debido a un funcionamiento incorrecto de cualquiera
de nuestros productos, incluida esta unidad y la batería.
Identificación de las partes
1 Lámpara CHARGE
2 Lámparas indicadoras de estado de carga
3 Puerto USB Type-C®
4 Terminales para batería
5 Marca (en esta unidad)
6 Marca (en la batería)
7 Batería
Elementos que debe
preparar por su cuenta
a Un cable USB Type-C disponible en el mercado (USB-C® -
USB-C) capaz de suministrar una corriente eléctrica de 3 A
b Un suministro de alimentación USB PD (USB Power Delivery)
disponible en el mercado capaz de suministrar una potencia
de 30 W o más
Para cargar la batería
1 Instale la batería.
Al instalar la batería, asegúrese de que las marcas tanto
en la batería como en la unidad estén alineadas en la misma
dirección.
2 Utilizando un cable USB Type-C, conecte
los puertos USB Type-C en esta unidad y
un suministro de alimentación USB PD.
• Dependiendo del cable USB Type-C y el suministro de
alimentación USB PD, es posible que no se pueda cargar
correctamente la batería.
• Cuando se instalan dos baterías a esta unidad, se cargan
simultáneamente.
Indicaciones de las actividades de la lámpara
La lámpara CHARGE (naranja) se encenderá y se iniciará la carga.
La lámpara CHARGE se apaga cuando la batería está cargada
aproximadamente al 90%.
Las lámparas indicadoras de estado de carga se apagan después
de unos 30 minutos de carga continua. (Carga completa finalizada)
Notas
• No levante esta unidad agarrándola por la batería.
• Tenga especial cuidado de no golpear la batería contra esta
unidad, por ejemplo, al instalar la batería.
• Tenga cuidado de no pillarse los dedos cuando instale y retire
la batería.
• En función del suministro de alimentación USB PD, es posible
que la lámpara CHARGE se encienda y apague repetidamente
antes de que comience la carga. Sin embargo, una vez que la
lámpara CHARGE o las lámparas indicadoras de estado de carga
permanezcan encendidas, la carga continuará con normalidad.
Para retirar la batería
Retire la batería deslizándola en sentido opuesto al de su
instalación. Puede comprobar el estado de carga aproximado con
las lámparas indicadoras de estado de carga.
, ... Apagada, , ... Encendida
Lámpara CHARGE
0% - 30%
30% - 60%
60% - 90%
90% - Carga completa
Carga completa finalizada
Lámparas
indicadoras
de estado de carga
El nivel de carga mostrado por las lámparas indicadoras de estado de
carga y los porcentajes de la tabla de arriba son guías aproximadas.
El estado real puede variar dependiendo de la temperatura
ambiental o la condición de la batería.
Tiempo de carga
Batería NP-FZ100
El número de
las baterías a
cargar
Tiempo de carga completa
(Potencia de salida necesaria con el
suministro de alimentación USB PD)
1 Aprox. 155 minutos (18 W (9 V/2 A) o más)
2 Aprox. 155 minutos (30 W (15 V/2 A) o más)
• Para cargar dos baterías simultáneamente, puede usar un
suministro de alimentación USB PD capaz de enviar una potencia
de menos de 30 W, sin embargo, la carga llevará más tiempo.
• El tiempo de carga anterior es el tiempo necesario para cargar
completamente la batería agotada usando esta unidad a una
temperatura ambiente de 25 °C.
• El tiempo de carga anterior puede variar en función de la
temperatura ambiente, el estado de la batería, el cable USB
Type-C y el suministro de alimentación USB PD.
Solución de problemas
Lea lo siguiente para la inspección y solución de problemas.
Si esta unidad sigue sin funcionar después de la solución de
problemas, póngase en contacto con su distribuidor Sony o con
un centro de servicio técnico local autorizado de Sony.
La lámpara CHARGE tiene dos patrones de parpadeo.
Parpadea lentamente: se enciende y se apaga repetidamente
cada 1,5 segundos
Parpadea rápidamente: se enciende y se apaga repetidamente
cada 0,15 segundos
La solución depende del patrón de parpadeo de la lámpara
CHARGE.
La lámpara CHARGE sigue parpadeando
lentamente.
La carga de la batería se suspende y esta unidad está en espera.
Si la temperatura ambiente o la temperatura de la batería se
sale del intervalo de temperaturas adecuadas para la carga de
la batería, la unidad suspende automáticamente la carga de la
batería. Cuando la temperatura ambiente o la temperatura de la
batería vuelve al intervalo de temperatura adecuado, la lámpara
CHARGE deja de parpadear y permanece encendida para indicar
que la unidad p1-ha reanudado la carga de la batería. Se recomienda
que cargue la batería cuando la temperatura ambiente esté
dentro del intervalo de 10 °C a 30 °C.
(Continúa en la página posterior)
2
1 2
6
3
4
5
7
1
Probleemoplossing Sony BC-ZD1
Als je de handleiding al zorgvuldig hebt gelezen maar geen oplossing voor je probleem hebt gevonden, vraag dan andere gebruikers om hulp
Specificaties
| Merk: | Sony |
| Categorie: | Batterij-oplader |
| Model: | BC-ZD1 |