Sony
Audio en video
RDH-GTK11iP
Sony RDH-GTK11iP Handleiding
Hier is de Sony RDH-GTK11iP (Audio en video) gebruikershandleiding. 2 pagina's in taal Nederlands met een gewicht van 1,476,880.0 Mb. Als u geen antwoorden op uw probleem kunt vinden Vraag het onze community.
Pagina 1/2
FST-GTK33iP/GTK11iP/RDH-GTK33iP/GTK11iP (GB) 4-418-233-11 (1)
WARNING
To reduce the risk of re, do not cover the ventilation
opening of the apparatus with newspapers, tablecloths,
curtains, etc. Do not place the naked ame sources such
as lighted candles on the apparatus.
To reduce the risk of re or electric shock, do not expose
this apparatus to dripping or splashing, and do not place
objects lled with liquids, such as vases, on the apparatus.
Do not install the appliance in a conned space, such as a
bookcase or built-in cabinet.
As the main plug is used to disconnect the unit from the
mains, connect the unit to an easily accessible AC outlet.
Should you notice an abnormality in the unit, disconnect
the main plug from the AC outlet immediately.
Do not expose batteries or apparatus with battery-
installed to excessive heat such as sunshine, re or the
like.
e unit is not disconnected from the mains as long as it
is connected to the AC outlet, even if the unit itself has
been turned o.
Notice for customers: the following
information is only applicable to
equipment sold in countries applying EU
directives.
e manufacturer of this product is Sony Corporation,
1-7-1 Konan Minato-ku Tokyo, 108-0075 Japan. e
Authorized Representative for EMC and product safety is
Sony Deutschland GmbH, Hedelnger Strasse 61, 70327
Stuttgart, Germany. For any service or guarantee matters
please refer to the addresses given in separate service or
guarantee documents.
For customers in Europe and
Australia
Disposal of Old Electrical &
Electronic Equipment
(Applicable in the European
Union and other European
countries with separate
collection systems)
is symbol on the product or on its packaging indicates
that this product shall not be treated as household
waste. Instead it shall be handed over to the applicable
collection point for the recycling of electrical and
electronic equipment. By ensuring this product is
disposed of correctly, you will help prevent potential
negative consequences for the environment and human
health, which could otherwise be caused by inappropriate
waste handling of this product. e recycling of materials
will help to conserve natural resources. For more detailed
information about recycling of this product, please
contact your local Civic Oce, your household waste
disposal service or the shop where you purchased the
product.
Applicable accessories: Remote commander
Europe Only
Disposal of waste batteries
(applicable in the European
Union and other European
countries with separate
collection systems)
is symbol on the battery or on the packaging indicates
that the battery provided with this product shall not be
treated as household waste.
On certain batteries this symbol might be used in
combination with a chemical symbol. e chemical
symbols for mercury (Hg) or lead (Pb) are added if the
battery contains more than 0.0005% mercury or 0.004%
lead.
By ensuring these batteries are disposed of correctly,
you will help prevent potentially negative consequences
for the environment and human health which could
otherwise be caused by inappropriate waste handling of
the battery. e recycling of the materials will help to
conserve natural resources.
In case of products that for safety, performance or data
integrity reasons require a permanent connection with an
incorporated battery, this battery should be replaced by
qualied service sta only. To ensure that the battery will
be treated properly, hand over the product at end-of-life
to the applicable collection point for the recycling of
electrical and electronic equipment.
For all other batteries, please view the section on how
to remove the battery from the product safely. Hand the
battery over to the applicable collection point for the
recycling of waste batteries.
For more detailed information about recycling of this
product or battery, please contact your local Civic Oce,
your household waste disposal service or the shop where
you purchased the product.
License and Trademark Notice
iPhone, iPod, iPod classic, iPod nano, and iPod touch
are trademarks of Apple Inc., registered in the U.S. and
other countries.
MPEG Layer-3 audio coding technology and patents
licensed from Fraunhofer IIS and omson.
Windows Media is either a registered trademark or
trademark of Microso Corporation in the United
States and/or other countries.
is product contains technology subject to certain
intellectual property rights of Microso. Use or
distribution of this technology outside of this product
is prohibited without the appropriate license(s) from
Microso.
All other trademarks and registered trademarks are of
their respective holders. In this manual,
™
and
®
marks
are not specied.
Operations
Getting StartedLocation of Controls
Unit (Top)
Unit (Front)
Rear
Note
Headphone output is not available as this system does not have a
headphone jack.
Remote
is manual mainly explains operations using the
remote, but the same operations can also be performed
using the buttons on the unit having the same or similar
names.
To lock the buttons on the unit (Child lock
function)
You can lock the buttons except (on/standby)
on
the unit to prevent them from being operated by mistake.
Hold down
on the unit until “CHILD LOCK ON”
or “CHILD LOCK OFF” appears on the display
. e
buttons except
on the unit will be locked or
unlocked.
Note
e child lock will be cancelled when you disconnect the power cord.
Tip
Operations using the buttons of the remote are possible even when the
child lock function is enabled.
Playing the iPod/iPhone
1 Select the iPod function.
Press FUNCTION +/
repeatedly.
2 Place the iPod/iPhone onto the iPod/iPhone
connector
.
3 Press the PUSH button and secure the iPod/iPhone.
4 Start playback.
Press
.
To control the iPod/iPhone
To Press
Pause playback
(pause) / (stop)
.
Select a track
or chapter of
audiobook/
podcast
(go back)/ (go forward)
. To fast-forward or fast-rewind,
hold down the button.
Find a point in a
track or chapter
of audiobook/
podcast
Hold down (rewind)/ (fast
forward)
during playback, and
release the button at the desired
point.
Choose the
selected item
(enter)
.
Scroll up/down
the iPod menus
/
.
Return to the
previous menu or
select a menu
TOOL MENU /RETURN
(return)
.
To use the system as a battery charger
You can use the system as a battery charger for an iPod/
iPhone whether the system is on or o.
When charging the iPod/iPhone while the system is
on, make sure to select a function other than the USB
function.
e charging begins when the iPod/iPhone is placed
on the iPod/iPhone connector
. e charging status
appears on the iPod/iPhone display. When charging the
iPod/iPhone, place the iPod/iPhone on the connector
with the iPod/iPhone player stopped.
For details, see the user’s guide of your iPod/iPhone.
To stop charging an iPod/iPhone
Remove the iPod/iPhone.
Notes on charging an iPod/iPhone
When the USB function is selected while the system is on, you
cannot charge an iPod/iPhone.
If the display mode is demonstration or clock, you cannot charge an
iPod/iPhone even if the system is o.
If you press DISPLAY
while charging when the system is o,
the system stops charging an iPod/iPhone. To restart charging of an
iPod/iPhone, reconnect the iPod/iPhone when the display mode is
Power Saving mode.
Notes
Turn the “Shake to Shue” function o on the iPod/iPhone to avoid
unexpected track changes when listening to music at high volumes.
If the battery of the iPod/iPhone is empty, the system may not
recognize it. In such a case, recharge it with a computer, etc. then
connect it to the system.
e performance of the system may vary, depending on the
specications of your iPod/iPhone.
When placing or removing the iPod/iPhone, handle the iPod/iPhone
in the same angle as that of the iPod/iPhone connector on the unit
and do not twist or sway the iPod/iPhone to prevent connector
damage.
Do not carry the unit with an iPod/iPhone set on the connector.
Doing so may cause a malfunction.
When placing or removing the iPod/iPhone, brace the unit with one
hand and take care not to press the controls of the iPod/iPhone by
mistake.
Before disconnecting the iPod/iPhone, pause playback.
Hold down /
to fast-rewind (or fast-forward) while
playing video if /
does not function.
To change the volume level, use VOLUME +/
. e volume level
does not change if you adjust it on the iPod/iPhone.
is system is designed for iPod/iPhone only. You cannot connect
any other portable audio players to the iPod/iPhone connector.
To use an iPod/iPhone, refer to the user’s guide of your iPod/iPhone.
Sony cannot accept responsibility in the event that data recorded to
iPod/iPhone is lost or damaged when using an iPod/iPhone with
this system.
Playing a le of the USB device
e audio format that can be played back on this system
is MP3/WMA*/AAC*.
* Files with DRM (Digital Rights Management) copyright protection
or les downloaded from an online music store cannot be played
on this system. If you try to play one of these les, the system plays
the next unprotected audio le.
Check the websites below for the information about
compatible USB devices.
For customers in Latin America:
<http://esupport.sony.com/LA>
For customers in Europe and Russia:
<http://support.sony-europe.com/>
For customers in other countries/regions:
<http://www.sony-asia.com/support>
1 Select the USB function.
Press FUNCTION +/
repeatedly.
2 Connect the USB device to the (USB) port
.
3 Start playback.
Press
.
Other operations
To Press
Pause playback
(pause)
. To resume play, press
the button again.
Stop playback
(stop)
. To resume play, press
(play)
*
1
. To cancel resume
play, press
again*
2
.
Select a folder
+/
repeatedly.
Select a le
(go back)/ (go forward)
.
Find a point in
a le
Hold down (rewind)/ (fast
forward)
during playback, and
release the button at the desired
point.
Select Repeat Play
REPEAT
repeatedly until “ ”
(repeat all tracks) or “ ” (repeat
one track) appears.
*
1
When playing a VBR MP3/WMA le, the system may resume
playback from a dierent point.
*
2
Resume play returns to the top folder.
To change the play mode
Press PLAY MODE
repeatedly. You can select Normal
Play mode (playback in sequence of all les on the USB
device), Folder Play mode (“FLDR” for all les in the
specied folder on the USB device), or Shue Play mode
(“SHUF”).
Notes on the play mode
When you select Shue Play mode “SHUF,” the system shue-plays
all audio les on the connected USB device in random order. Shue
Play mode may play the same le repeatedly.
When the play mode is set to Folder Play mode, “ ” is not
available.
When the play mode is set to Shue Play mode, the repeat function
is not available.
When repeat play is set, Shue Play mode is not available. When
repeat play is set to “ ,” Folder Play mode is not available.
When you turn o the system, the selected Shue Play mode
(“SHUF”) is cleared and the play mode returns to Normal Play
mode.
Note on Repeat play
If you select “ ” when the system is in Normal Play mode, the system
executes repeat play of all audio les on the USB device until you stop
playback. If you select “ ” when the system is in Folder Play mode,
the system executes repeat play of all audio les in the selected folder
until you stop playback.
Notes
When USB cable connection is necessary, connect the USB cable
supplied with the USB device. See the operation manual supplied
with the USB device for details on the operation method.
It may take about 10 seconds before “READING” appears depending
on the type of USB device connected.
Do not connect the system and the USB device through a USB hub.
When the USB device is connected, the system reads all the les on
the USB device. If there are many folders or les on the USB device,
it may take a long time to nish reading the USB device.
With some connected USB devices, aer an operation is performed,
there may be a delay before it is performed by this system.
Compatibility with all encoding/writing soware cannot be
guaranteed. If audio les on the USB device were originally encoded
with incompatible soware, those les may produce noise or
interrupted sound, or may not be played back at all.
is system cannot play audio les on the USB device in the
following cases;
when the total number of audio les in a folder exceeds 100.
when the total number of audio les on a USB device exceeds
10,000.
when the total number of folders on a USB device exceeds 100
(including the “ROOT” folder and empty folders).
ese numbers may vary depending on the le and folder structure.
Do not save other types of les or unnecessary folders on a USB
device that has audio les.
e system can play back to a depth of 8 folders only.
is system does not necessarily support all the functions provided
with a connected USB device.
Resume play will be cancelled when you disconnect the power cord.
Folders that have no audio les are skipped.
e audio formats that you can listen to with this system are as
follows:
MP3: le extension “.mp3”
WMA: le extension “.wma”
AAC: le extension “.m4a”
Note that even when le name has the correct le extension, if the
actual le diers, the system may produce noise or may malfunction.
Power
Connect the power cord to a wall outlet.
e demonstration appears on the display
. When you press
, the
system turns on and the demonstration automatically ends.
If the supplied adaptor on the plug does not t your wall outlet, detach it from the
plug (only for models equipped with an adaptor).
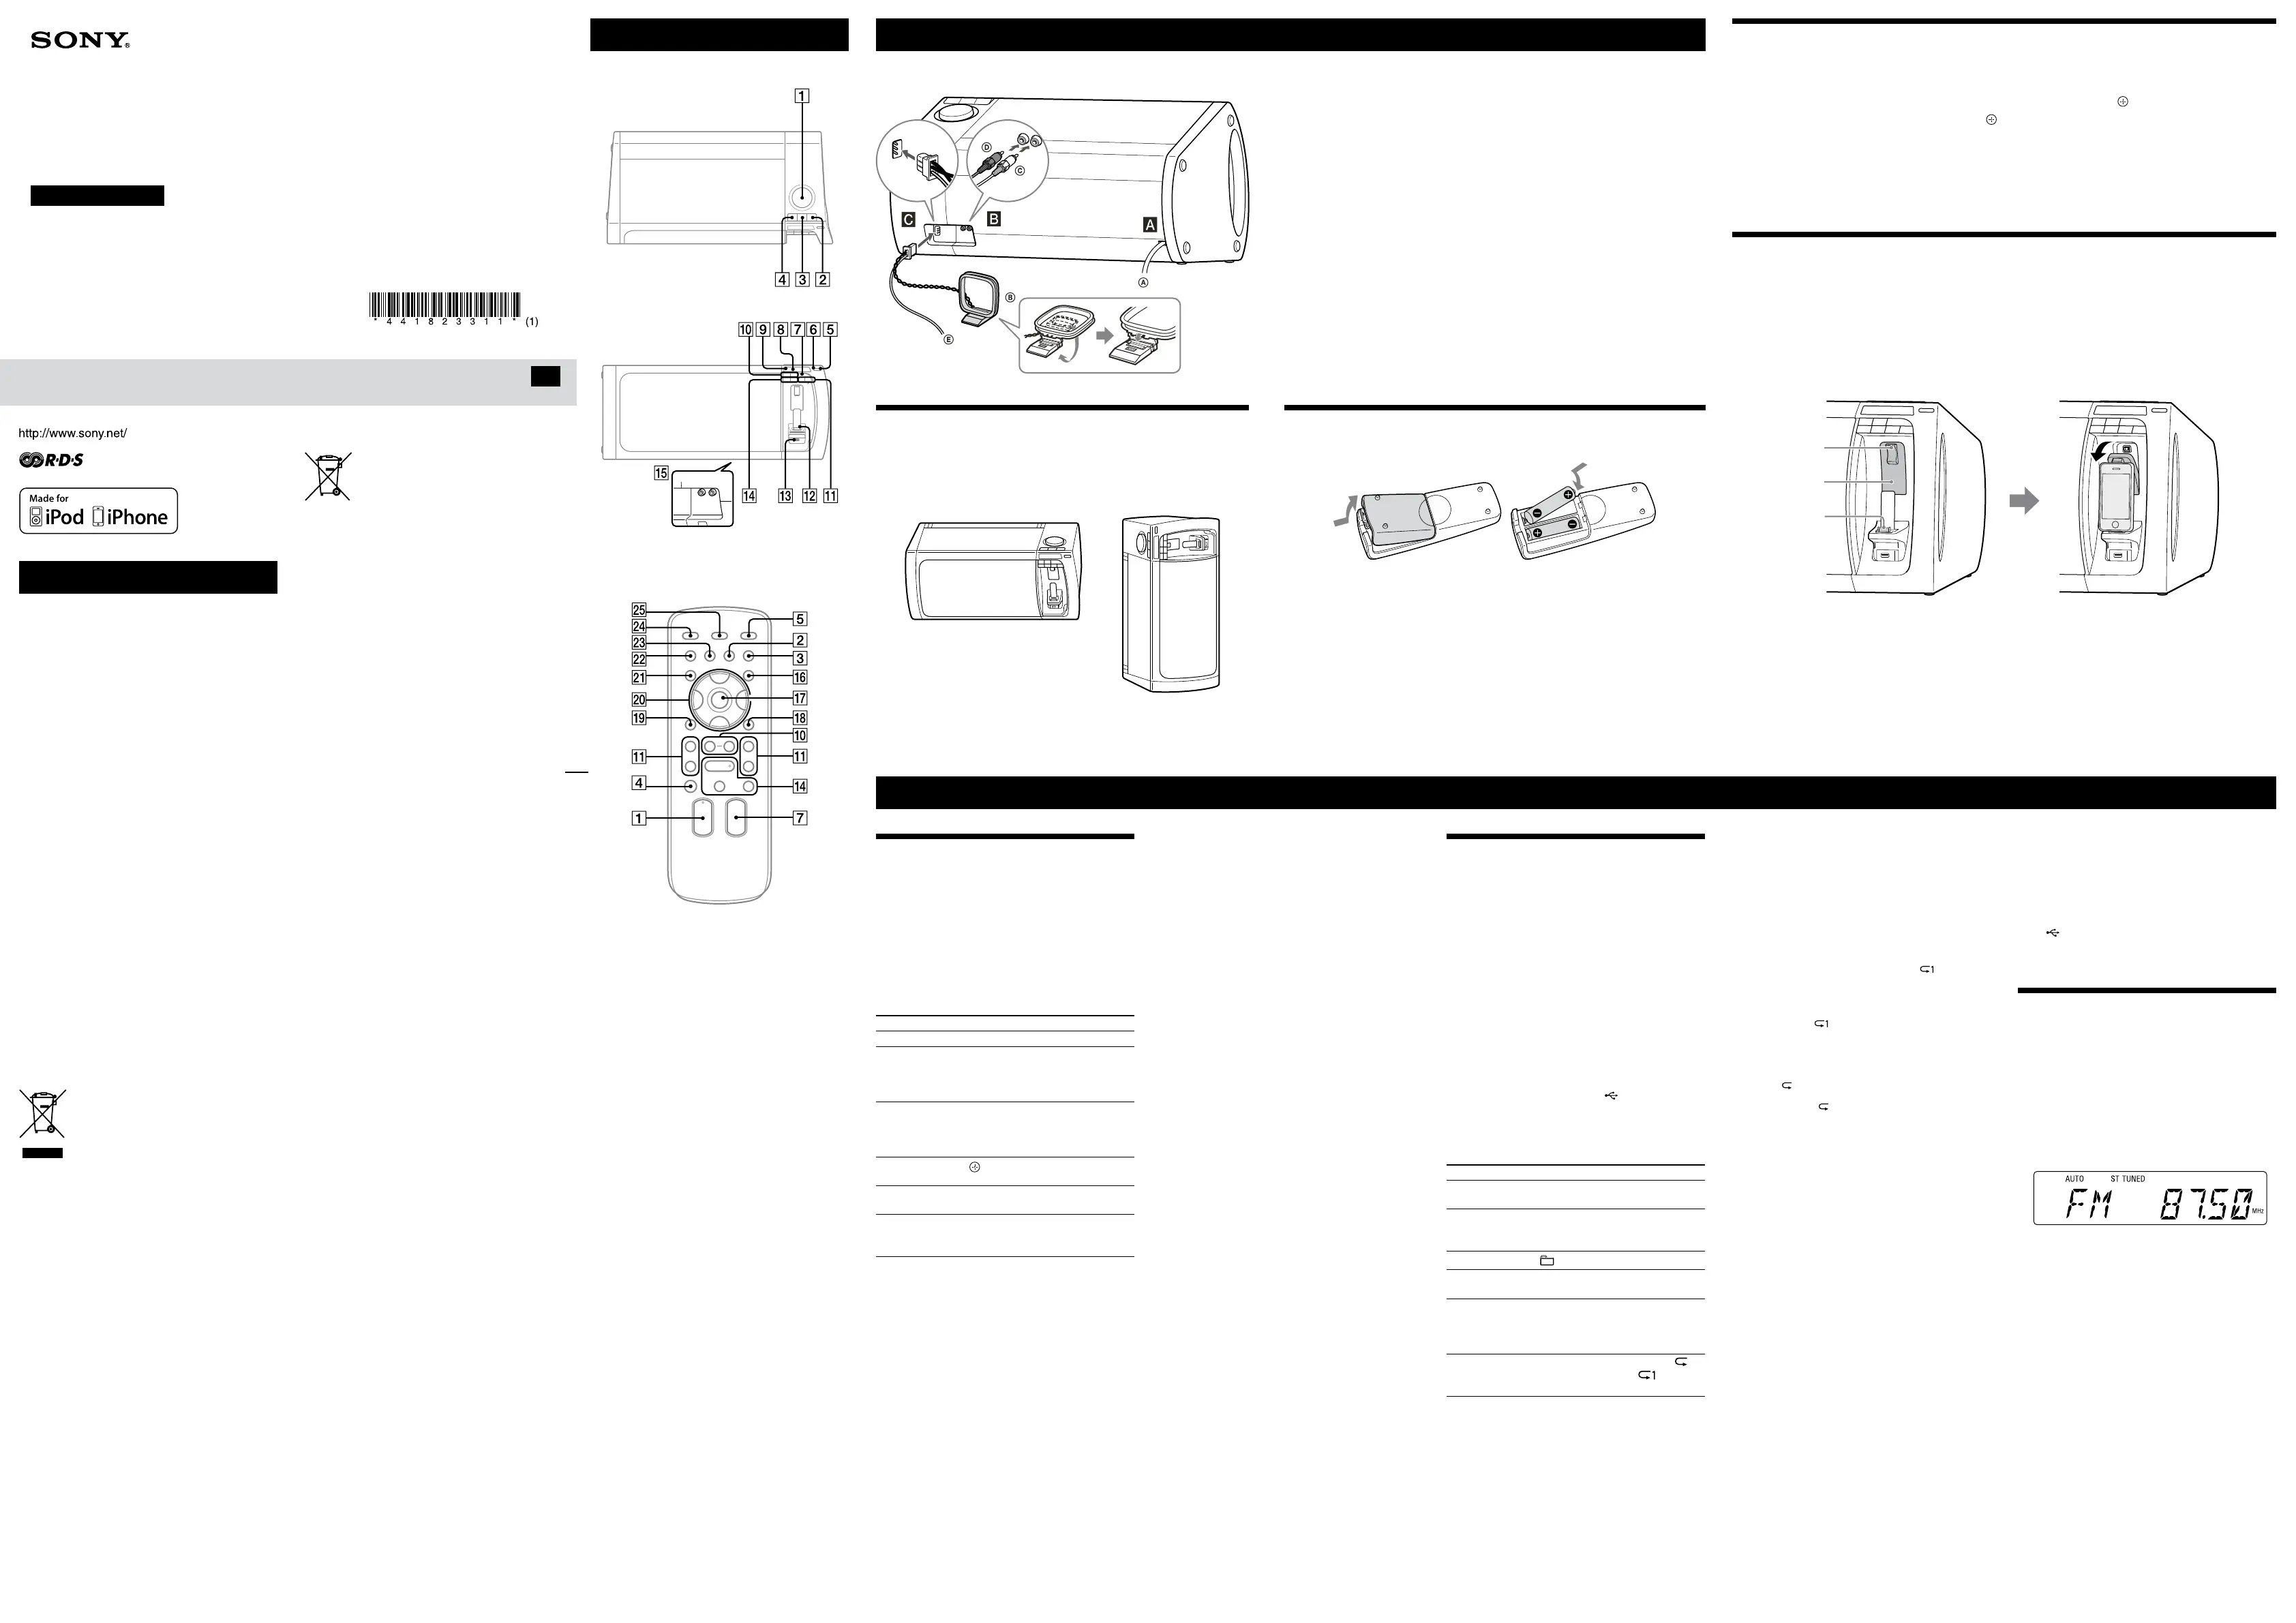
Audio in L/R (DVD/PC IN jacks)
Connect an optional component such as digital audio players or a device with
analog audio outputs, using a commercially available RCA audio input cable.
Antennas
When inserting the connector of FM lead/AM loop antenna, make sure to insert it
in the correct orientation.
Find a location and an orientation that provide good reception when you set up
the antennas.
Keep the antennas away from the power cord to avoid picking up noise.
To use the system as a battery charger
You can use the system as a battery charger for USB
devices that have a rechargeable function when the
system is on.
Press FUNCTION +/
repeatedly to select the USB
function.
e charging begins when the USB device is connected
to the (USB) port
. e charge status appears on
the USB device display. For details, see the user’s guide of
your USB device.
Listening to the radio
1 Select the tuner (TUNER FM/TUNER AM) function.
Press FUNCTION +/
repeatedly.
2 Perform tuning.
For automatic scanning
Press TUNING MODE
repeatedly until “AUTO”
appears, and then press +/
. Scanning stops
automatically and “TUNED” and “ST” (for stereo
programs only) light up on the display
when a
station is found.
If “TUNED” does not light up and the scanning does
not stop, press
to stop scanning, then perform
manual tuning (below).
When you tune to an FM station that provides RDS
services, information such as the service name or
station name is provided by broadcasts.
For manual tuning
Press TUNING MODE
repeatedly until “AUTO”
and “PRESET” disappear, and then press +/
repeatedly to tune to the desired station.
Tip
To reduce static noise on a weak FM stereo station, press FM MODE
repeatedly until “MONO” appears to turn o stereo reception. You
will lose stereo eect, but reception will improve.
To wall outlet
AM loop antenna
To DVD/PC IN L jack
To DVD/PC IN R jack
FM lead antenna (Extend
it horizontally.)
Installing the system
e system can be installed either vertically or horizontally. Select the installation
style based on your preferences (except for iPod nano model users). Note that with
this system, horizontal installation is required when using iPod nano models.
Horizontal installation
Vertical installation
Using the remote
Insert the two R6 (size AA) batteries (supplied), matching the polarities shown below.
Notes on using the remote
With normal use, the batteries should last for about 6 months.
Do not mix an old battery with a new one or mix dierent types of batteries.
If you do not use the remote for a long period of time, remove the batteries to avoid damage from battery leakage
and corrosion.
Setting the clock
1 Press
to turn on the system.
2 Press TIMER MENU
to select the clock set mode.
If “PLAY SET” ashes, press /
repeatedly to select “CLOCK,” and then press (enter)
.
3 Press /
repeatedly to set the hour, then press
.
4 Use the same procedure to set the minutes.
Note
e clock settings are reset when you disconnect the power cord or if a power failure occurs.
To display the clock when the system is o
Press DISPLAY
. e clock is displayed for about 8 seconds.
Using the iPod/iPhone
To prevent the iPod/iPhone from falling, always secure the iPod/iPhone with the holding arm when using the iPod/
iPhone with this system. When removing the iPod/iPhone, li up the holding arm until it clicks and snaps into position,
and then disconnect the iPod/iPhone from the iPod/iPhone connector.
1 Place the iPod/iPhone onto the iPod/iPhone connector.
2 Press the PUSH button until the holding arm is released with a click.
e holding arm ips out to secure the iPod/iPhone.
iPod/iPhone
connector
PUSH button
Holding arm
Note for iPod nano model users
DO NOT install the system vertically when using iPod nano models with this system. iPod nano models cannot be secured with the holding arm
because of their height. Install the system horizontally.
Note on carrying the system
DO NOT carry the system with the iPod/iPhone connected. If you do, the iPod/iPhone may fall and be damaged. Sony cannot accept responsibility
for any damage caused by inappropriate usage.
Notes
When using commercially available iPod/iPhone cases, the connected iPod/iPhone may not be recognized by the system. If this happens, remove
the case from the iPod/iPhone and reconnect it to the iPod/iPhone connector.
When using a vertically installed system, make sure that the connected iPod/iPhone remains upright, not tilted.
4-418-233-11 (1)
HOME AUDIO
DOCKING SYSTEM
©2012 Sony Corporation Printed in China
FST-GTK33iP/GTK11iP
RDH-GTK33iP/GTK11iP
Operating Instructions
GB
Probleemoplossing Sony RDH-GTK11iP
Als je de handleiding al zorgvuldig hebt gelezen maar geen oplossing voor je probleem hebt gevonden, vraag dan andere gebruikers om hulp
Specificaties
| Kleur van het product: | Zwart |
| Gewicht: | 16800 g |
| Bluetooth: | Nee |
| Afstandsbediening: | RM-AMU137 |
| Snelstartgids: | Ja |
| Aantal USB 2.0-poorten: | 1 |
| Microfoon, line-in ingang: | Ja |
| Gemiddeld vermogen: | 230 W |
| FM-radio: | Ja |
| Equalizer-instellingen: | Ja |
| Backlight: | Ja |
| Audio-uitgangskanalen: | 2.0 kanalen |
| Frequentiebereik: | - Hz |
| Equalizer modus: | Flat, hip hop, jazz, Pop, Rock, Techno |
| Ondersteunde frequentiebanden: | AM, FM |
| Afmetingen (B x D x H): | 749 x 449 x 416 mm |
| Inclusief RDS tuner: | Ja |
| Apple docking-compatibiliteit: | iPhone, iPod |
| Ingebouwde lader: | Ja |
| Afstandsbediening inbegrepen: | Ja |
| Batterijen inbegrepen: | Ja |