Lexibook
Wekkerradio
RLT100D
Lexibook RLT100D Handleiding
Hier is de Lexibook RLT100D (Wekkerradio) gebruikershandleiding. 5 pagina's in taal met een gewicht van 3,727,320.0 Mb. Als u geen antwoorden op uw probleem kunt vinden Vraag het onze community.
Pagina 1/5
MY EDUCA
MY EDUCA
MY EDUCA
MY EDUCATIONAL
TIONAL
TIONAL
TIONAL MY EDUCATIONAL
SLEEP COMP
SLEEP COMP
SLEEP COMP
SLEEP COMPANION
ANION
ANION
ANION SLEEP COMPANION
Instruction manual / Manuel d'instruction / Manual de instrucciones /
Manuale di istruzioni / Manual de instruções /
Gebrauchsanweisung / Gebruikershandleiding / Brugervejledning
RLT100D
Découvrez ses superbes effets lumineux !
Discover his great light effects!
¡Descubre sus geniales efectos de luz!
Scoprite i suoi fantastici effetti luminosi!
Descubra os seus fantásticos efeitos de luz!
Entdecken Sie seine tollen Lichteffekte!
Ontdek zijn geweldige lichteffecten!
Oplev hans fantastiske lyseffekter!
1 5
8
6
10
9
12
13
2
4
11
7
3
14
23
22
21
20
15
16
17
18
19
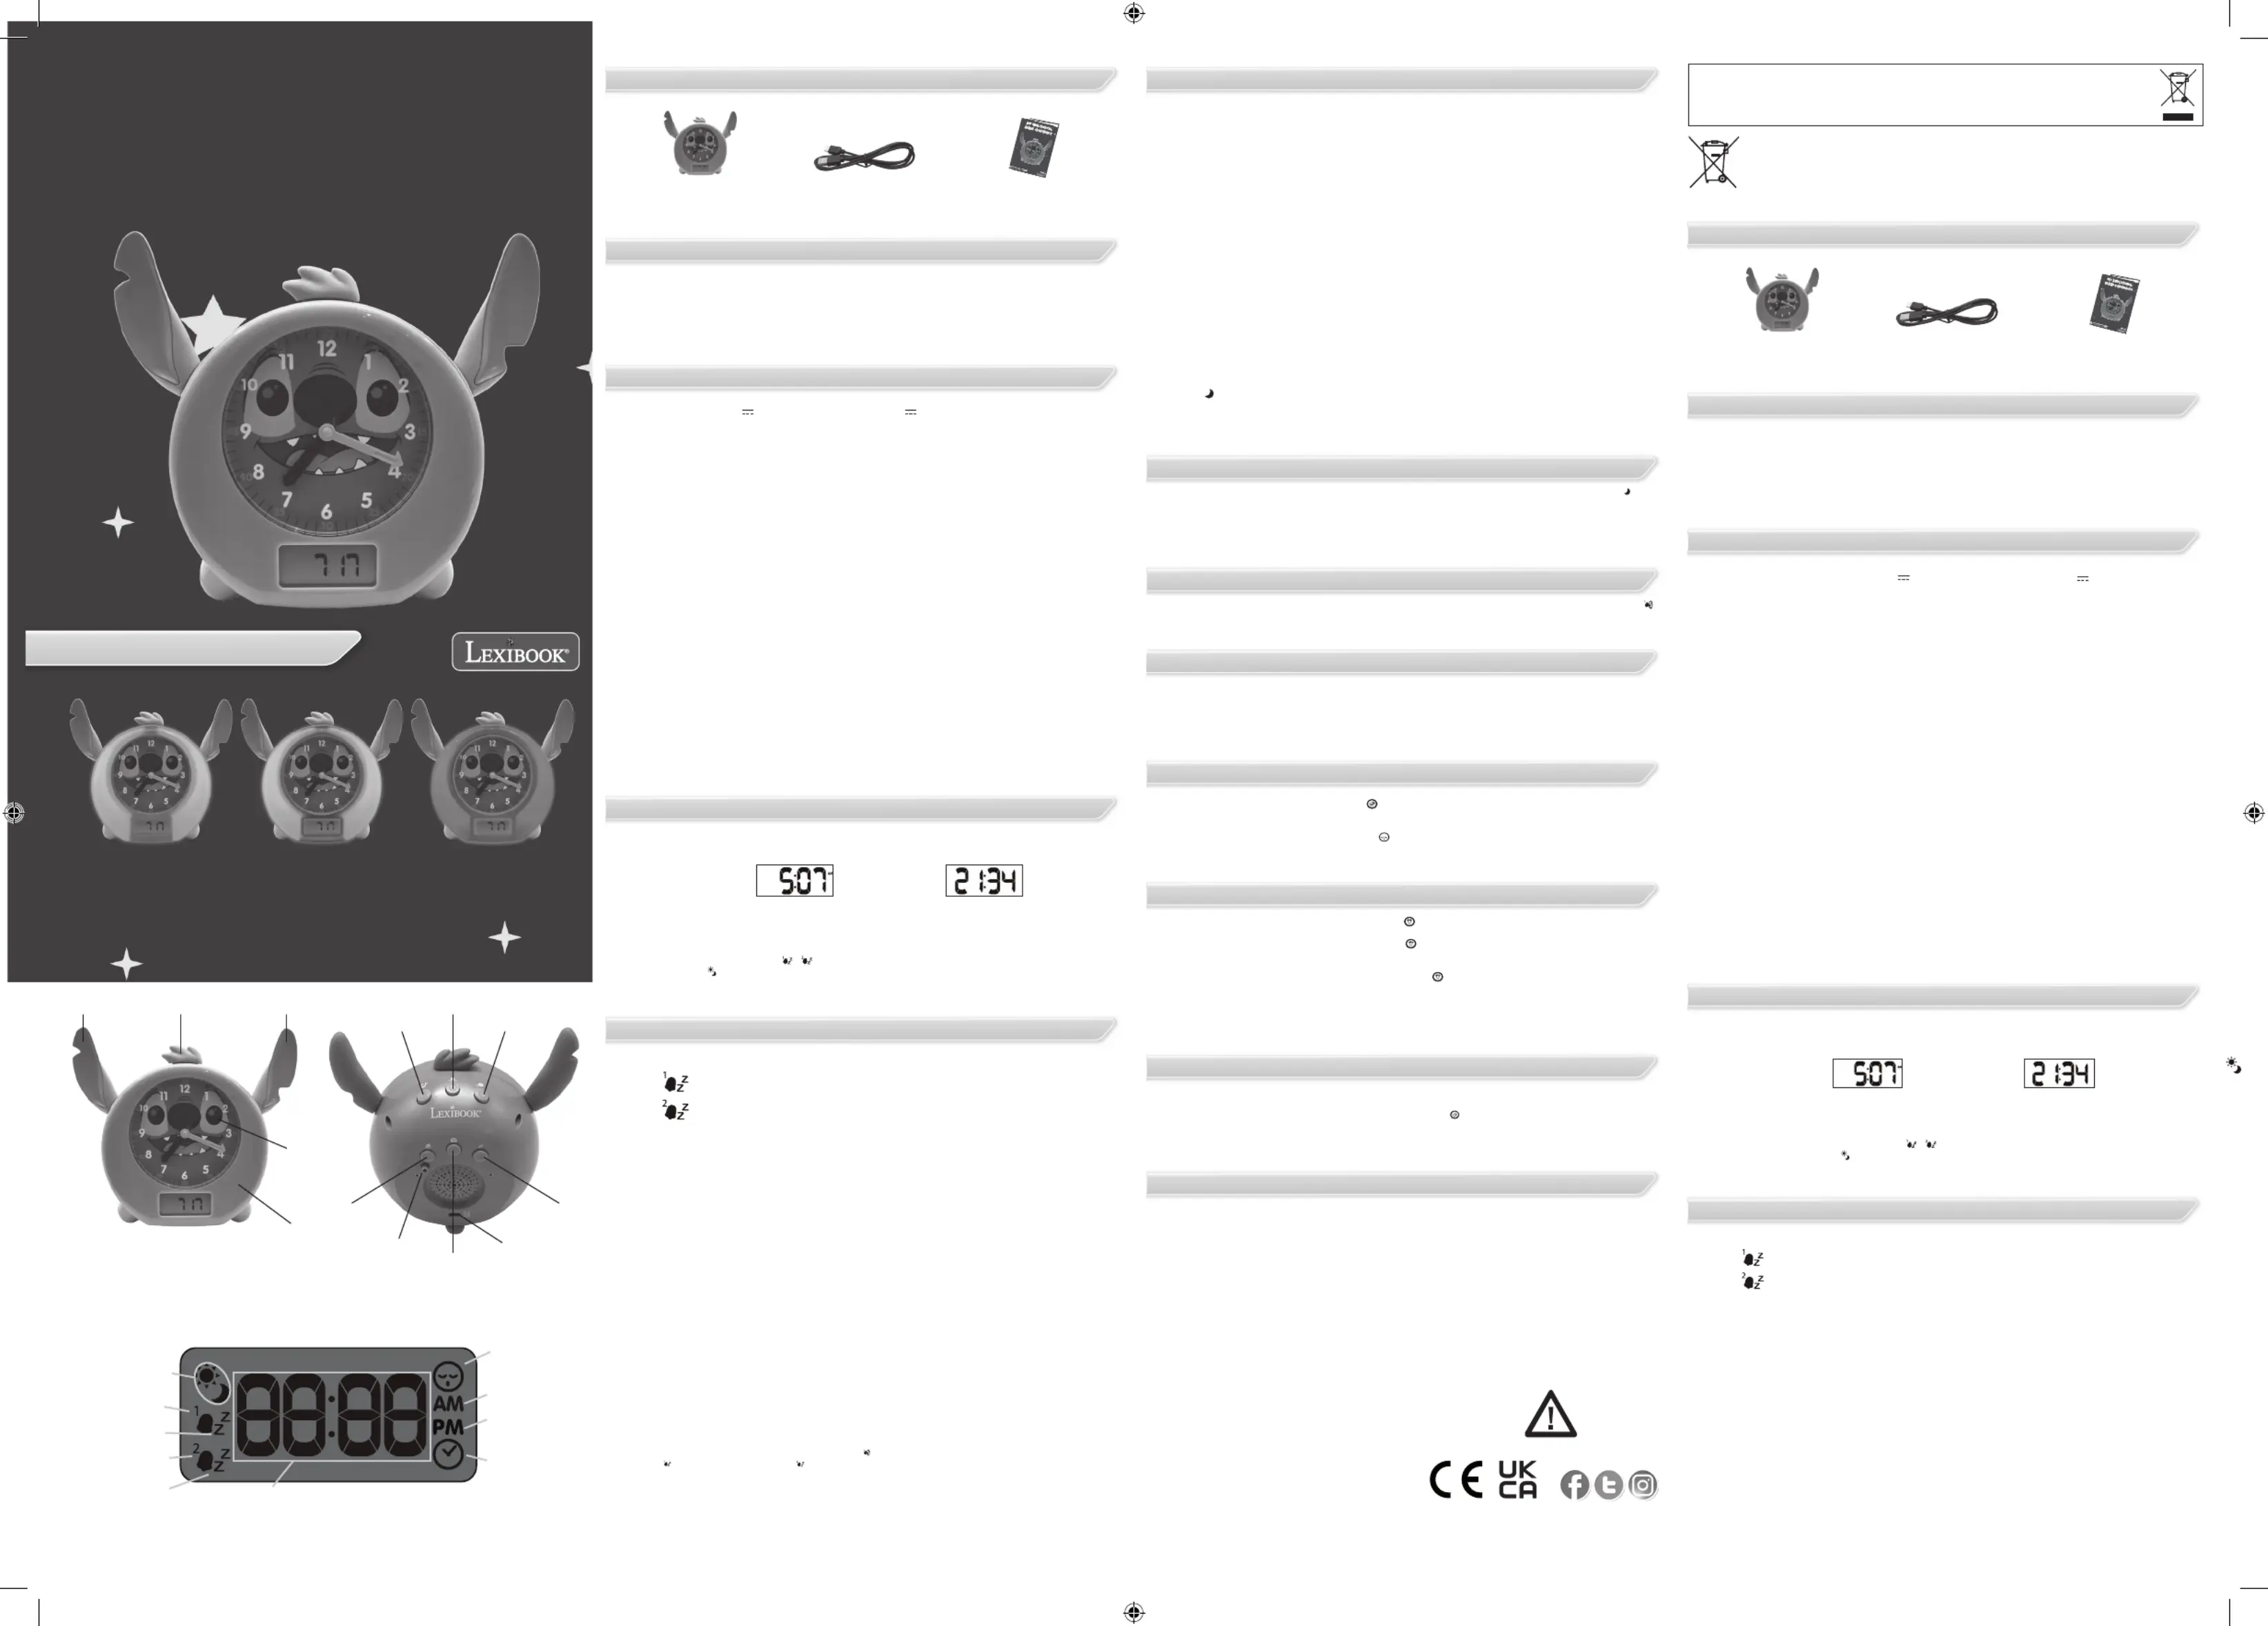
UNPACKING
DÉBALLAGE
BUTTON CONTROL
POWER SUPPLY
SETTING THE CLOCK
ACtivation/deactivation of the alarm
Activation of melodies :
maintenance and warranty
activation of the light functions :
Nap function :
Sunrise/sunset functions :
ACtivation/deactivation of the snooze
Setting the bedtime :
SETTING OF WAKE-UP TIME :
EN
FR
When unpacking, ensure that the following parts are included:
WARNING: All packaging materials, such as adhesive tape, plastic sheets, strings and labels are not part
of the product and should be discarded.
1. Validate
2. Go backward.
3. Go forward.
4. Melodies key.
5. Light effects key.
6. Nap key.
7. Alarm key.
8. Digital time setting key.
1 x Stitch sleep companion 1 x USB-C charging cable 1 x Instruction manual
9. Sleep key.
10. Charging slot.
11. Analogue time setting key.
12. Open and close my eyes.
13. Lights up.
14. Sunrise/Sunset function activated
15. Alarm 1
16. Snooze alarm 1
17. Alarm 2
18. Snooze alarm 2
19. Hour / Minute
20. Time icon appearing during
clock setting
21. Afternoon
22. Morning
23. Nap mode
This Stitch sleep companion operates with a USB type C charging cable (included) or with a USB type
adaptor (not included) 5.0V 1000mA. Lithium battery 3.7V 1200mAh
Turn ON/OFF the product:
Long Press simultaneously “Music” (4) and “Nap” (6)keys for 2 seconds to turn ON or OFF the product.
Charging the device
1. Check that the unit is switched off.
2. Insert the small end of the USB type C cable (included) into the USB type C charging slot (10).
3. Connect the other end of the cable into the USB port of your powered computer or USB type power
adaptor and connect it to a wall socket.
4. The LED light ashes in red when the device is charging. Once charged, the LED light will stay red.
WARNING: Mal-function or loss of memory may be caused by strong frequency interference or electro-
static discharge. Should any abnormal function occur, switch it off and then on again, or unplug the USB
cable.
WARNING:
• Danger of explosion if battery is incorrectly replaced. Please only replace it with the same or equivalent
battery
• Battery shall not be exposed to excessive heat such as sunshine, re or the like.
• Keep a minimum distance around the device for sufcient ventilation;
• the ventilation should not be impeded by covering the ventilation openings with items, such as
newspapers, table-cloths, curtains, etc.;
• No naked ame sources, such as lighted candles, should be placed on the apparatus;
• The use of apparatus in moderate climates.
• Batteries should be disposed properly. Take them to the collection container in order to protect the
environment;
• Replacement of a battery with an incorrect type that can defeat a safeguard (for example, in the case of
some lithium battery types);
• Disposal of a battery into re or a hot oven, or mechanically crushing or cutting of a battery, that can
result in an explosion;
• Leaving a battery in an extremely high temperature surrounding environment that can result in an
explosion or the leakage of ammable liquid or gas; and
• A battery subjected to extremely low air pressure that may result in an explosion or the leakage of
ammable liquid or gas
1. Turn on the clock by pressing simultaneously the Nap (6) and Melodies (4) buttons.
2. Choose between 24H or 12H time display. Change by pressing the Forward (3) or Backward (2) keys.
To select, press on the Validate key (1).
1) Long press the Alarm key (7).
You can set 2 alarms:
Alarm 1:
Alarm 2:
First choose which alarm you are setting. The corresponding alarm icon will appear on the screen. To
switch to the other one, short press (2) or (3) buttons.
Note: the process is the same for both Alarm 1 and Alarm 2 setting.
2) Choose for how many days the Wake-up alarm will work:
7d → the alarm will automatically ring 7 consecutive days.
6d → the alarm will automatically ring 6 consecutive days.
5d → the alarm will automatically ring 5 consecutive days.
Short press on the Alarm key (7) or on the Validate key (1) to select.
3) Indicate to the clock which day we are in the week.
d1 / d2 / d3 /d4 / d5 / d6 / d7
Example: , if you only want the alarm to ring on the weekdays and not the weekend:
a) Select 5d.
b) Indicate to the clock the actual day you are setting the alarm:
If you set it on a Monday → select 1d
If you set it on a Tuesday → select d2
If you set it on a Wednesday → select d3
If you set it on a Thursday → select d4
If you set it on a Friday → select d5
If you set it on a Saturday → select d6
If you set it on a Sunday → select d7
4) Set the alarm sleep time hour. Change by pressing the Forward (3) or Backward (2) keys and select by
short pressing on the Validate key (1) or the Alarm key (7).
5) Set the alarm sleep time minutes. Change by pressing the Forward (3) or Backward (2) keys and
select by short pressing on the Validate key (1) or the Alarm key (7).
6) Choose the alarm you want amongst the 14 melodies.
7) Set the volume of the alarm choosing from level 1 to level 4.
8) Choose if you want to activate the snooze function. When snooze is enabled for an alarm, ‘zZ’ appears
on the display to the right of the alarm 1 or 2 icon.
9) The icon if you set the Alarm 1 (or if you set the Alarm 2) appears on the screen to indicate the
Wake-up time is set.
The setting sequence is displayed in the following order:
Numbers of days the alarm in ON > day you are setting the alarm > Hours > Minutes >
Alarm melodies > Volume of the alarm > Snooze
1) Long press the Sleep key (9).
First, you can choose for how many days the Sleep alarm will work:
7d → the alarm will automatically ring 7 consecutive days.
6d → the alarm will automatically ring 6 consecutive days.
5d → the alarm will automatically ring 5 consecutive days.
Short press on the Sleep key (9) or on the Validate key (1) to select.
2) Indicate to the clock which day we are in the week.
d1 / d2 / d3 /d4 / d5 / d6 / d7
Example: if you only want the alarm to ring on the weekdays and not the weekend:
a) Select 5d.
b) Then, indicate to the clock the actual day you are setting the alarm:
If you set it on a Monday → select 1d
If you set it on a Tuesday → select d2
If you set it on a Wednesday → select d3
If you set it on a Thursday → select d4
If you set it on a Friday → select d5
If you set it on a Saturday → select d6
If you set it on a Sunday → select d7
3) Set the alarm sleep time hour. Change by pressing the Forward (3) or Backward (2) keys and select by
short pressing on the Validate key (1) or the Sleep key (9).
4) Set the alarm sleep time minutes. Change by pressing the Forward (3) or Backward (2) keys and
select by short pressing on the Validate key (1) or the Sleep key (9).
5) Choose the alarm you want amongst the 14 melodies.
6) Set the volume of the alarm choosing from level 1 to level 4.
7) Choose the number of minutes the alarm melody will play once the clock reaches the Bedtime time.
8) The icon appears on the screen to indicate the Bedtime is set.
The setting sequence is displayed in the following order:
Numbers of days the alarm in ON > day you are setting the alarm > Hours > Minutes > Alarm
melodies > Volume of the alarm > numbers of minutes the alarm will ring.
If 12-hour is
chosen:
If 24-hour is
chosen:
3) Then you need to set the time. Change by pressing the Forward (3) or Backward (2) keys and select
by pressing on the Validate key (1).
4) Finally, you will have to choose if you want to turn ON or OFF the alarm. If activated, the icon below
will appear on the top left of the screen.
- For wake-up alarm: alarm icons /
- For sleep alarm:
The setting sequence is displayed in the following order:
12/24h mode > Hours > Minutes > Activation of the alarm or not
To activate Wake-up alarm 1/2 or Bedtime alarm, briey press button 7 (respectively 9). The icon and
your wake-up time setting appears on the display (respectively this icon and your Bedtime alarm setting
appears on the display).
Short press again button 7 (respectively 9) for the icon to disappear from the screen display.
Note: the alarm is activated when the icon appears on the screen and deactivated when the icon doesn’t
appear on the screen.
When snooze is enabled for an alarm, ‘zZ’ appears on the display to the right of the alarm 1 or 2 icon.
When the alarm is activated and the alarm time is reached, the alarm will automatically sound at the
selected ringtone and volume. To stop the alarm before the minute is up, simply press any button.
If the sunrise/sunset function is activated (ON), the Stitch sleep companion will progressively decrease
its brightness 30 min before the bedtime to simulate a sunset.
If the sunrise/sunset function is activated (ON), the Stitch sleep companion will progressively brighten up
30 min before the alarm time to simulate a sunrise.
To deactivate this function (OFF), press Digital time setting key (8) and return to the sunrise/sunset time
setting
To activate nap mode, briey press button 6 . Then use the two ears (buttons 2 and 3) to select the
desired nap alarm melody. Note: you can choose between 14 melodies. Press 6 again to conrm. You
can choose between 15, 30, 45, 62, 90, 120 minutes.
The following icon then appears on the screen.
To stop the nap alarm once it has sounded, press any button. The nap mode is then deactivated.
To exit nap mode before the selected nap time has elapsed, simply press the 6 button, The icon will
disappear from the screen.
• To switch on the mood lights, press button 5 briey . Stitch then lights up and the colours alternate
automatically (alternative colour mode by default).
• To switch off the lights, press button 5 again briey.
• To select the desired light colour, press the ears (Button 2 or 3). The selected colour will remain frozen
until you select the alternative colour mode again with buttons 2 or 3.
• To adjust the intensity of the light, keep button 5 pressed . The available intensity levels are then dis
played on the screen one by one. You can choose an intensity level from 1 to 4. Release button 5 when
the desired intensity level is reached.
• Once the ambient light mode is activated, the desired lighting duration can be selected by briey
pressing button 1 at the top of the product. It is possible to choose between 15, 30, 45, 60 minutes of
lighting by pressing button 1 several times. Once the desired lighting time is shown on the display,
release button 1.
You can choose 4 melodies to relax or have fun with.
To activate Melody mode, press once on the Melodies key (4) . A melody will then be played and the
number of the melody will be displayed on the digital display of the alarm clock. To change melody press
button 3 for next and 2 for previous. To exit the melody mode during playback, press the Melodies key
(4) again. The alarm clock will exit the melody mode automatically when the selected music is nished
playing
Ensure that you switch off the device and unplug the power cable before cleaning. Wipe the device with a
soft, dry cloth. If the surfaces are particularly dirty, clean them with a cloth that has been soaked in soapy
water and then wrung out thoroughly. Wipe again with a dry cloth. Never use alcohol, petrol, solvents,
cleaning products or other chemical products. And do not use compressed air to remove dust. At least
charge the Stitch Sleep Companion once every 3 months in order to maintain the battery life.
This product is covered by our 2 years warranty program, except for the integrated battery which is
covered by a 6-month warranty.
For any claim under the warranty or after sale service, please contact your distributor and present a valid
proof of purchase. Our warranty covers any manufacturing material and workmanship defect, with the
exception of any deterioration arising from the non-observance of the instruction manual or from any
careless action implemented on this item (such as dismantling, exposition
to heat and humidity, etc.). It is recommended to keep the packaging for any further reference.
In a bid to keep improving our services, we could implement modication on the colours and the details of
the product shown on the packaging.
NOTE: Please keep this instruction manual, it contains important information.
Reference: RLT100D
Designed and developed in Europe – Made in China
Lexibook S.A.
6 avenue des Andes
Bâtiment 11
91940 Les Ulis
France
www.lexibook.com – © Lexibook®
United Kingdom & Ireland
For after-sales service, please contact us at savcomfr@lexibook.com.
Lexibook UK
PO Box 59
SOUTH MOLTON
EX36 9AU
UK
Environmental Protection
Unwanted electrical appliances can be recycled and should not be discarded along with regular household waste! Please
actively support the conservation of resources and help protect the environment by returning this appliance to a collection
centre (if available).
Correct disposal of batteries in this product
(Applicable in countries with separate collection systems)
This symbol means that the product contains a built-in rechargeable battery covered by European Directive 2013/56/ EU
which cannot be disposed of with normal household waste. All batteries should be disposed separately from the municipal
waste stream via designated collection facilities appointed by the government or the local authorities. The correct disposal of
your old batteries will help to prevent potential negative consequences for the environment, animal and human health. We
strongly advise you to take your product to an ofcial collection point or service center to have a professional remove the
rechargeable battery. Inform yourself about the local separate collection system for electrical and electronic products and
rechargeable batteries. Follow local rules and never dispose of the product and rechargeable batteries with normal household waste. For
more detailed information about disposal of your old batteries, please contact your city ofce or waste disposal service centre.
Suivez-nous
@LexibookCom
This product
is not a toy.
BOUTONS DE CONTRÔLE
RÉGLAGE DE L'HORLOGE
Réglage de l'heure de réveil
ALIMENTATION
Lors du déballage, assurez-vous que les pièces suivantes sont incluses
AVERTISSEMENT : Tous les matériaux d’emballage, tels que le ruban adhésif, les feuilles de plastique,
les celles et les étiquettes ne font pas partie du produit et doivent être jetés.
1. Valider
2. Revenir en arrière.
3. Aller vers l’avant.
4. Touche Mélodies.
5. Touche effets de lumière.
6. Touche Nap.
7. Touche Alarme.
8. Touche de réglage de
l’heure numérique.
1 x Compagnon de sommeil
Stitch
1 x câble de charge USB-C 1 x Manuel d’instruction
9. Touche de mise en veille.
10. Fente de chargement.
11. Touche de réglage de l’heure
analogique.
12. Ouvrir et fermer les yeux.
13. S’allume.
14. Fonction lever/coucher de
soleil activée
15. Alarme 1
16. Répétition de l’alarme 1
17. Alarme 2
18. Répétition de l’alarme 2
19. Heure / Minutes
20. Icône de l’heure apparaissant
lors du réglage de l’horloge
21. Après-midi
22. Matin
23. Mode sieste
Ce compagnon de sommeil Stitch fonctionne avec un câble de charge USB de type C (inclus) ou avec un
adaptateur de type USB (non inclus) 5.0V 1000mA. Batterie au lithium 3.7V 1200mAh
Allumer/éteindre le produit :
Appuyez simultanément sur les touches “Musique” (4) et “Sieste” (6) pendant 2 secondes pour allumer
ou éteindre le produit.
Chargement de l’appareil
1. Vérier que l’appareil est éteint.
2. Insérez la petite extrémité du câble USB de type C (fourni) dans la fente de chargement USB de type
C (10).
3. Branchez l’autre extrémité du câble dans le port USB de votre ordinateur alimenté ou dans un
adaptateur d’alimentation de type USB et connectez-le à une prise murale.
4. Le voyant LED clignote en rouge lorsque l’appareil est en cours de chargement. Une fois l’appareil
chargé, le voyant reste rouge.
AVERTISSEMENT : Un mauvais fonctionnement ou une perte de mémoire peut être causé par de fortes
interférences de fréquence ou des décharges électrostatiques. En cas de fonctionnement anormal,
éteignez puis rallumez l’appareil ou débranchez le câble USB.
AVERTISSEMENT :
• Risque d’explosion en cas de remplacement incorrect de la batterie. Ne la remplacez que par une pile
identique ou équivalente.
• La batterie ne doit pas être exposée à une chaleur excessive (soleil, feu, etc.).
• Maintenez une distance minimale autour de l’appareil pour assurer une ventilation sufsante ;
• La ventilation ne doit pas être entravée en couvrant les ouvertures de ventilation avec des objets tels
que des journaux, des nappes, des rideaux, etc ;
• Aucune source de amme nue, telle que des bougies allumées, ne doit être placée sur l’appareil ;
• L’utilisation de l’appareil dans des climats modérés.
• Les piles doivent être éliminées de manière appropriée. Les piles doivent être éliminées de manière
appropriée et déposées dans le conteneur de collecte an de protéger l’environnement ;
• Le remplacement d’une pile par un type de pile incorrect qui peut neutraliser une protection (par
exemple, dans le cas de certains types de piles au lithium) ;
• Jeter une pile au feu ou dans un four chaud, ou écraser ou couper mécaniquement une pile, ce qui peut
provoquer une explosion ;
• Laisser une batterie dans un environnement où la température est extrêmement élevée, ce qui peut
entraîner une explosion ou la fuite d’un liquide ou d’un gaz inammable ; et
• Une batterie soumise à une pression d’air extrêmement basse qui peut entraîner une explosion ou une
fuite de liquide ou de gaz inammable.
1. Mettez l’horloge en marche en appuyant simultanément sur les touches Nap (6) et Mélodies (4).
2. Choisissez entre l’afchage de l’heure 24H ou 12H. Changez en appuyant sur les touches Avance (3)
ou Retour (2). Pour sélectionner, appuyez sur la touche Valider (1).
1) Appuyez longuement sur la touche Alarme (7).
Vous pouvez régler 2 alarmes :
Alarme 1 :
Alarme 2 :
Choisissez d’abord l’alarme que vous souhaitez régler. L’icône de l’alarme correspondante apparaît à
l’écran. Pour passer à l’autre alarme, appuyez brièvement sur les boutons (2) ou (3).
Remarque : la procédure est la même pour le réglage de l’alarme 1 et de l’alarme 2.
2) Choisissez le nombre de jours pendant lesquels l’alarme de réveil fonctionnera :
7j → l’alarme sonnera automatiquement 7 jours consécutifs.
6d → l’alarme sonnera automatiquement 6 jours consécutifs.
5d → l’alarme sonnera automatiquement 5 jours consécutifs.
Appuyez brièvement sur la touche Alarme (7) ou sur la touche Validation (1) pour
sélectionner.
3) Indiquer à l’horloge quel jour nous sommes dans la semaine.
d1 / d2 / d3 /d4 / d5 / d6 / d7
Exemple : Si vous souhaitez que l’alarme ne sonne que les jours de la semaine et pas le week-end :
a) Sélectionnez 5d.
b) Indiquez à l’horloge le jour où vous réglez l’alarme :
Si vous la réglez sur un lundi → sélectionnez 1d
Si vous la réglez sur un mardi → sélectionnez d2
Si vous l’avez programmée un mercredi → sélectionnez d3
Si vous le xez un jeudi → sélectionnez d4
Si vous le xez un vendredi → sélectionnez d5
Si vous le xez un samedi → sélectionnez d6
Si vous le réglez sur un dimanche → sélectionnez d7
Si l’option 12 heures
est choisie :
Si l’option 24 heures
est choisie :
3) Vous devez ensuite régler l’heure. Changez en appuyant sur les touches Avance (3) ou Retour (2) et
sélectionnez en appuyant sur la touche Valider (1).
4) Enn, vous devrez choisir si vous souhaitez activer ou désactiver l’alarme. Si elle est activée, l’icône
ci-dessous apparaîtra en haut à gauche de l’écran.
- Pour l’alarme de réveil : icônes d’alarme /
- Pour l’alarme de sommeil :
La séquence de réglage est afchée dans l’ordre suivant :
Mode 12/24h > Heures > Minutes > Activation ou non de l’alarme
RLT100DIM2333_346_V07.indd 1
RLT100DIM2333_346_V07.indd 1
RLT100DIM2333_346_V07.indd 1
RLT100DIM2333_346_V07.indd 1RLT100DIM2333_346_V07.indd 1 16/8/2023 6:02 PM
16/8/2023 6:02 PM
16/8/2023 6:02 PM
16/8/2023 6:02 PM16/8/2023 6:02 PM
Probleemoplossing Lexibook RLT100D
Als je de handleiding al zorgvuldig hebt gelezen maar geen oplossing voor je probleem hebt gevonden, vraag dan andere gebruikers om hulp
Specificaties
| Merk: | Lexibook |
| Categorie: | Wekkerradio |
| Model: | RLT100D |